Readers' Choice


Popular articles
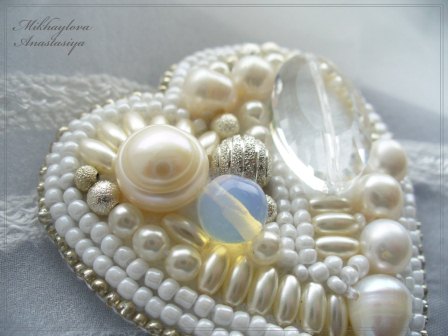
Long-forgotten beads are once again popular. This one is not done in the form of ordinary bracelets or embroidery, but by the creation of designer accessories, where beads are combined with rhinestones, glass beads, beads and hemispheres and play with new colors.
And many more magnificent brooches:
And again I present to your attention a brooch embroidered with beads - Heart. For decoration you can use any beads, beads, rhinestones. The main thing is to combine materials harmoniously. And the technique is so good for sweet leftovers - everything will suit the craftswoman.

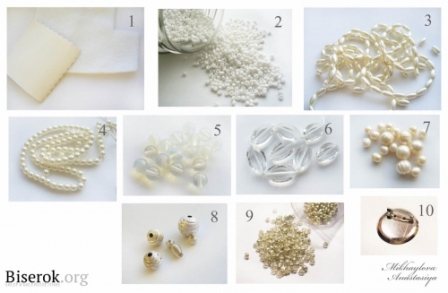
And so, for this brooch we used: dense non-flowing base fabric and a piece of leatherette, white beads No. 10, oblong-shaped beads (“rice”) of pearl color, length 6 mm, round beads of pearl color, diameter 4 mm, one transparent glass bead 8 mm, one faceted glass bead size 23x18 mm, freshwater pearls of various shapes and sizes, metal beads (also called “sugar”) 8, 4 and 3 mm, silver beads No. 10, glue gun, threads, bead needle .
Step-by-step instruction:
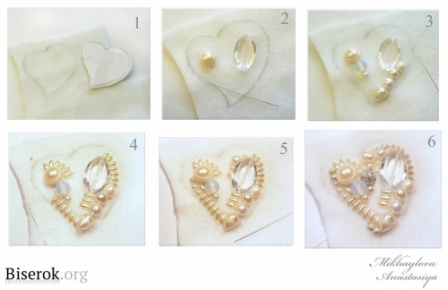
First, draw a template of the future beaded brooch on paper. We cut out the template from the fabric and start sewing the beads on from the largest ones. We sew the beads like a button - in several stitches. We hide all the knots and tails on the wrong side. Next we sew pearls and smaller beads, then rice beads and smaller beads - round and metal.

We close the voids with white beads (according to the diagram above) and use them to make a row of edging for the beaded brooch. We make a second row of edging and fill in the voids. We cut out the brooch, leaving 1 mm from the beads. The main thing is that the stitches are not cut, otherwise all the work will be in vain.

We make a blank from leatherette and cut it out. Using beads, we sew the leatherette and the blank.

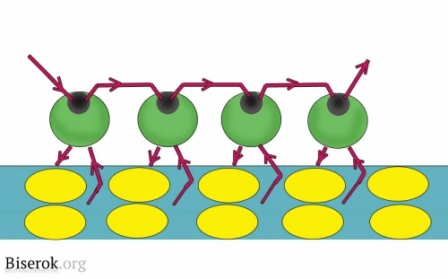
Sew the beads with silver beads. We pierce the fabric from the inside out and place the needle in the space between the rows. The knot should be between the fabric and the leatherette. Next, we string 2 beads, pierce the leatherette and fabric, and take the needle out into the area. We tighten the thread and insert the needle into the second bead from the bottom up, tighten the thread. We string 1 more bead, pierce the leatherette and fabric, again bring the needle out between two rows of beads, tighten the thread, and again insert the needle into the free bead from the bottom up. We tighten the thread. And so on according to the scheme.
This is how we sew fabric and leatherette. When sewing the edges, make sure the line is even and the thread tension is equal. If the sizes of the white and silver beads are the same, then it turns out that the thread is hidden between the white beads of the top row, and the number of white and silver beads is the same.

It's always nice to wear a beautiful thing made with your own hands. It seemed to me that this brooch is not difficult to make and everyone can try it. The master class is detailed, thanks to the author!
To create jewelry, you can use any beads and seed beads; the main principle of selecting material is a harmonious combination. The good thing about this technique is that you can find a use for all the leftovers and lonely beads in your bins.

So, I used the following materials:
1.dense, non-flowing white fabric (felt) and a piece of light leatherette
2. white beads No. 10
3. oblong-shaped beads (“rice”), pearl color, length 6 mm
4.round pearl beads, diameter 4mm
5.one 8mm clear glass bead
6. one faceted glass bead, size 23x18 mm
7.river pearls of various shapes and sizes
8. metal beads (they are also called “sugar”) 8, 4 and 3 mm
9.silver beads No. 10
10.Brooch base
11. glue (I used a glue gun)
12.threads, bead needle
Creation stages:

1. draw a template for the future product on paper, cut it out, apply it to the fabric and trace it
2. We begin to sew on the largest beads - faceted and pearl. (sew on in several stitches, like a button). All knots and tails remain on the wrong side
3. next to the large ones we sew smaller beads, as well as pearls
4. sew on “rice” beads
5. Next in line are round beads with a diameter of 4 mm
6. Next come metal beads
7. Next, we begin to fill the remaining voids with white beads, and also make one row of edging. We sew beads according to the pattern

8. continue to make the second row of beaded edging
9.after edging, fill the remaining voids with beads, you get a blank for a brooch
10. Carefully cut it out, leaving about 1 mm of fabric around the perimeter, the main thing is not to cut the stitches.
11. wrong side
12. take leatherette, apply our blank and trace it
13. we trust
14. We begin to sew the workpiece and leatherette using beads.

Take silver beads. We pierce the fabric from the wrong side and place the needle in the gap between two rows of beads. The knot should remain on the wrong side of the fabric, between the fabric and the leatherette.
15. string 2 beads on a thread, pierce the leatherette and fabric, bring the needle out between two rows of beads
16. tighten the thread and insert the needle into the second bead from bottom to top, tighten the thread
17. string 1 more bead, pierce the leatherette and fabric, again bring the needle out between two rows of beads, tighten the thread, and again insert the needle into the free bead from the bottom up. We tighten the thread.
18 also sews on the 4th bead.
here is a sample diagram


19. We begin to sew the edge of the brooch, sewing fabric and leatherette
20. this is how the edge should look from the wrong side
21. this is how the beads should be positioned
22. we trim the edge of the brooch, make sure that the beads are located exactly in one line, for this the thread tension should be the same. If the sizes of the white and silver beads are the same, then it turns out that the thread is hidden between the white beads of the top row, and the sheer number of white and silver beads same
Elizabeth II is convinced that a brooch and a pair of beautiful earrings can add the necessary charm to even the simplest outfit. Fortunately, the queen’s collection is so extensive that there is no shortage of favorite accessories.

Elizabeth's favorite piece of jewelry is the Cullinan V brooch or the Heart Brooch, made from part of the largest diamond in the world, the Cullinan, or as it is also called the Star of Africa.
The nugget was found on January 25, 1905 in South Africa and named after the mine owner, Thomas Cullinan. A couple of years later, the government of the English Transvaal Colony presented the diamond to King Edward VII on his birthday. After studying the stone, it was decided to divide it into several parts that could be used to decorate the regalia of the British royal family. So in 1908 the diamond was split into 9 large and 96 small diamonds. Some of them can be found in the crown and scepter of the British Empire, and others can be found in the unique jewelry of monarchs.
The Cullinan V gets its name from the heart-shaped diamond (18.8 carats) that sits in the center of the piece. In 1910, the South African government presented this stone to Queen Mary, at whose request it was placed in a removable setting of diamonds and platinum. At the beginning of the 20th century, Queen Mary wore the jewel not only as a brooch, but also as part of an emerald and diamond bodice decoration; now her granddaughter likes to decorate the lapels of her coats and jackets with it.


Another equally outstanding brooch is also made from fragments of the “Star of Africa” - Cullinan III and IV. The top of the brooch is a nearly 64-carat square-cut diamond, on which hangs a pear-shaped 94.4-carat Cullinan III.
Within the royal family, this brooch is affectionately known as Granny's Chips, meaning that these massive diamonds were chipped from a giant diamond.
Despite the fact that both stones can be worn separately, Elizabeth II never separates the “Small Stars of Africa”, and, moreover, complements them with other massive precious jewelry.


In the collection of Elizabeth II, which numbers more than 100 brooches, you can find not only family heirlooms that she inherited, but also personal gifts. Among the especially valuable specimens are those that were given to the queen by her parents.
The Flower Basket brooch was presented to Elizabeth by her parents in November 1948 in honor of the birth of their first child, Prince Charles. The flower basket is encrusted with diamonds, sapphires, emeralds and rubies. Another valuable gift is a pair of aquamarine clip-on brooches that Elizabeth received for her 18th birthday. The brooches are a stylized "W" - the first letter of the British royal family's surname Windsor.


These two brooches are part of a collection of jewelry called the Cambridge Emeralds, which belonged to the Queen's grandmother, Mary of Teck. The history of this collection begins in 1818, when Adolph Frederick, Duke of Cambridge, married Augusta of Hesse-Kassel. After the celebration, the couple went on a honeymoon around Germany. While visiting Frankfurt, Princess Augusta took part in a lottery organized to raise funds for charity. With this act, the princess wanted to support the organizers, but unexpectedly she hit the jackpot and won the main prize of the lottery - 40 large emeralds. Upon returning home, the couple ordered that jewelry be created from the stones. Later, the stones passed through more than one hand to eventually end up in the collection of the royal family.
Today, out of the entire collection, Elizabeth II prefers to wear two brooches, which you can see in the pictures above. The first one is made of gold and platinum, in the center there is a square emerald surrounded by diamonds, and below there is an emerald cabochon. The second brooch, with a round emerald at the center and two rows of diamonds, also features a teardrop pendant that is detachable and can be worn on its own.


An elegant brooch in the shape of a maple leaf (the symbol of Canada) is not as majestic as the “Stars of Africa”, but is still extremely interesting. This diamond jewelry appeared in the royal family in 1939. George V gave the precious leaf to his wife Queen Mary on the occasion of their official visit to Canada.
Elizabeth first wore this inherited piece of jewelry in 1951, also during her first visit to Canada. The brooch received a second life in 2011, when the Queen lent it to her newly-made granddaughter-in-law Catherine during her first (and second) royal tour with William, of course, to Canada, the country of hockey and caribou. By the way, the Duchess of Cambridge often borrows jewelry from the Queen, although she herself already has a worthy collection, as you can read about in the article “The Duchess’s Jewelry: Kate Middleton’s Favorite Jewelry Brands.”


The New Zealand fern leaf brooch, the country's national symbol, was given to Elizabeth II as a Christmas gift in 1953 by the women of Auckland. The last time the decoration was seen on the queen was in 2008, and a few years later, namely in 2014, Kate Middleton walked the elegant leaf. Elizabeth lent the jewel to the Duchess of Cambridge on the occasion of her tour of Australia and New Zealand.
Note that Duchess Catherine was the first person the Queen allowed to borrow the “Fern Leaf” from her collection, so we can assume that Kate was given a special honor.


Elizabeth's brooches can be divided into several categories: by precious stones, materials, value and shape. In the first category, the invariable leader is occupied by diamonds, which is not surprising, and in the last category - bows. Among them, the following four brooches can be especially highlighted.
The first is Queen Victoria's bow brooch. This is Elizabeth’s favorite “every day” decoration. The brooch was a wedding gift to the Queen's grandmother from the people of Kensington, and was presented to her in 1893.
We invite you to familiarize yourself with the process of creating a heart brooch using the bead embroidery technique. This heart can also be used, for example, to decorate gift wrapping or a box.
To make a brooch you will need:
Beads and orange beads;
Openwork metal beads;
Carnelian chips;
Thread in the color of the beads;
Glue "Moment";
Brooch base;
Felt or other base for embroidery;
Heart template (here dimensions 5x4 cm).

Heart brooch step by step:
Attach the heart to the felt, trace (use a silver gel pen) and sew the outline with beads (photo 1-2).

Walk along the bead contour a couple of times with a thread - the beads will align and the row will become more even. Sew on the droplets (you can additionally glue them) (photo 3). Cover them with beads (photo 4).
Next, use your imagination and chaotically sew on chips of carnelian, beads - first the large ones, and between them the smaller ones (photo 5-7). Also fill the remaining gaps with beads - here they are golden and orange. Carefully cut out (photo 8).

At this stage, the back side of the heart will look like in photo 9. Next, take the brooch, attach it to the cardboard and trace it along the outline. Cut 2-3 mm smaller (you can make another one inside the outline and cut along it). The cardboard heart should be a couple of millimeters smaller than the one that was embroidered. Glue them together. Then attach the embroidered heart to the felt (felt) - also trace and cut out (photo 10). Sew the base for the brooch (photo 11). Glue (photo 12)
To create jewelry, you can use any beads and beads; the main principle of selecting material is a harmonious combination. The good thing about this technique is that you can find a use for all the leftovers and lonely beads in your bins.

So, I used the following materials:
1.dense, non-flowing white fabric (felt) and a piece of light leatherette
2. white beads No. 10
3. oblong-shaped beads (“rice”), pearl color, length 6 mm
4.round pearl beads, diameter 4mm
5.one 8mm clear glass bead
6. one faceted glass bead, size 23x18 mm
7.river pearls of various shapes and sizes
8. metal beads (they are also called “sugar”) 8, 4 and 3 mm
9.silver beads No. 10
10.Brooch base
11. glue (I used a glue gun)
12.threads, bead needle
Creation stages:

1. draw a template for the future product on paper, cut it out, apply it to the fabric and trace it
2. We begin to sew on the largest beads - faceted and pearl. (sew on in several stitches, like a button). All knots and tails remain on the wrong side
3. next to the large ones we sew smaller beads, as well as pearls
4. sew on “rice” beads
5. Next in line are round beads with a diameter of 4 mm
6. Next come metal beads
7. Next, we begin to fill the remaining voids with white beads, and also make one row of edging. We sew beads according to the pattern

8. continue to make the second row of beaded edging
9.after edging, fill the remaining voids with beads, you get a blank for a brooch
10. Carefully cut it out, leaving about 1 mm of fabric around the perimeter, the main thing is not to cut the stitches.
11. wrong side
12. take leatherette, apply our blank and trace it
13. we trust
14. We begin to sew the workpiece and leatherette using beads.

Take silver beads. We pierce the fabric from the wrong side and place the needle in the gap between two rows of beads. The knot should remain on the wrong side of the fabric, between the fabric and the leatherette.
15. string 2 beads on a thread, pierce the leatherette and fabric, bring the needle out between two rows of beads
16. tighten the thread and insert the needle into the second bead from bottom to top, tighten the thread
17. string 1 more bead, pierce the leatherette and fabric, again bring the needle out between two rows of beads, tighten the thread, and again insert the needle into the free bead from the bottom up. We tighten the thread.
18 also sews on the 4th bead.
here is a sample diagram


19. We begin to sew the edge of the brooch, sewing fabric and leatherette
20. this is how the edge should look from the wrong side
21. this is how the beads should be positioned
22. we trim the edge of the brooch, make sure that the beads are located exactly in one line, for this the thread tension should be the same. If the sizes of the white and silver beads are the same, then it turns out that the thread is hidden between the white beads of the top row, and the sheer number of white and silver beads same
| Related articles: | |
|
Decorating clothes with flowers, embroidery, beads, rhinestones, accessories, crochet, ribbons, applique
string(10) "error stat" string(10) "error stat" string(10) "error... Simple New Year's toys for a Christmas tree made of paper - ideas for DIY crafts with children Christmas tree with a cardboard ball
The crochet Christmas tree pendant can be crocheted in various colors... Postcard using origami technique “May 9”
Galina Shinaeva On the eve of the wonderful holiday of Victory Day, I propose... | |


