Readers' Choice


Popular articles
Galina Shinaeva
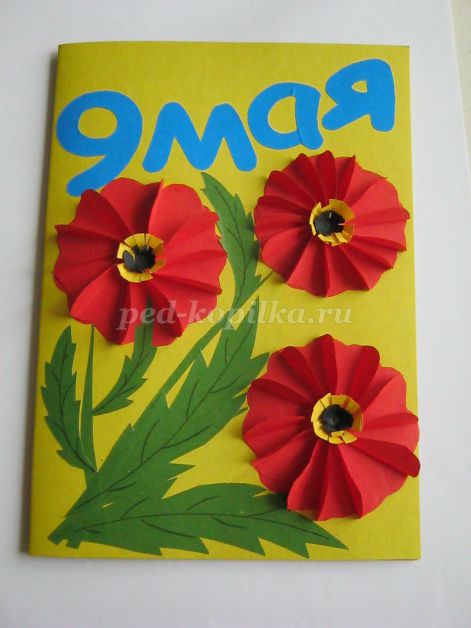
On the eve of the wonderful holiday of Victory Day, I bring to your attention a postcard made using the origami technique. The children of the preparatory group and I made these postcards as gifts for veterans. It has become a good tradition to invite veterans to visit on the eve of Victory Day!
Carnations are white, blue and red.
Red carnations are a symbol of Memory and grief, courage, bravery and Victory.
White color is a symbol of purity, nobility and frankness.
The color blue symbolizes honesty, fidelity, impeccability and chastity.

Colored cardboard - for the background (ours is golden);
Paper for origami or for a printer in white, blue, red and green - for inscriptions and carnations;
Orange and black colored paper for making a St. George ribbon;
PVA glue;
Scissors.

Cut 26 red squares with a side of 2.5 cm.

1) Take a square and bend it along the diagonals. (for display I took single-sided colored paper)

2) Fold the basic pancake shape

3) Turn over to the other side.

4) Fold the basic “Pancake” shape again.

5) Turn over to the other side.

6) Since the postcard is small in size (1.2 A4 sheets), we fold the basic “Pancake” shape a third time. The module turns out to be voluminous.

7) We perform all modules in the same way.
8) We will need several triangular parts, for this we cut the module in half diagonally.


10) Then, stick it on.
We will need wonderful squares:

8 white, 8 blue, 8 red with a side of 3 cm;
3 – green with a side of 3 cm;
3 green with a side of 6 cm.

1) Fold the square diagonally - the basic shape is “kerchief”.

2) Fold the “kerchief” in half.

3) Bend the top plane to the side.
The module is ready. Similarly, we make all modules with a side of 3 cm.


1) We put the second module into the first

(to make the flower stronger, we glue the parts together)

2) Thus, we assemble 2 blanks each, from 5 modules and from 3.

3) Glue a blank of 3 modules onto a blank of 5 modules.

4) Glue on the sepal – green module.

We make white, blue and red flowers in the same way.

from green squares with a side of 6 cm, rolling into a tube starting from the corner.

Add leaves to the stems.

Glue the resulting carnations onto the base.

We perform the St. George ribbon by applique using the sliding method.

The final touch is a silver paper fireworks display.
The postcard is ready.
Thank you for your attention.
Publications on the topic:
The spring holiday is approaching, March 8th, nature is awakening, which brings a good mood, and many, many bright, beautiful flowers. A symbol.
Dear Colleagues! I bring to your attention a master class on making a butterfly from colored paper. These butterflies are very easy to make.
Materials for work: a set of double-sided colored paper, scissors, a simple pencil, a ruler, a glue stick. Needed for crafts.
On the eve of the New Year, our group held a master class “Herringbone”. The host of the master class was Baltachev’s parent E.E. She taught.
In this master class you will learn how to make a miniature tank out of paper using the origami technique. The product will not only be an unusual and interesting craft for boys, but will also be useful as a bookmark for your favorite books. In addition, this children's paper craft for May 9 can serve as a useful school accessory. Such a tank can be made during a craft lesson at school and introduce children to the art of origami, since its production will not take much time.
1) Cut out the main central blank from green double-sided paper - a square measuring 20 by 20 cm or so. The larger the square, the larger the tank will be. Bend the resulting main part diagonally to obtain a right-angled isosceles triangle. The initially prepared part must be perfectly flat, so that after combining the two halves of the square (triangles), they clearly overlap each other.

2) Find the center on the hypotenuse of the resulting triangle and, focusing on it, bend the right and left sides up.

3) After the previous operation, you will see two folds on the green fabric, located at right angles. Using these folds as a guide, fold the top triangle, bringing the corner of the top layer down.

4) Next, form the corner itself for the entire bookmark. Place first one part of the workpiece under the triangle folded in a special way, then the other. And press the curves well. The resulting square with a pocket should be turned into a tank. So far it does not at all resemble the planned object.

5) To make tank tracks, use brown and black paper and scissors. From first grade paper, cut out an oblong oval with a small stand for further attachment to the base. Made of black paper - several small circles-wheels.

6) Glue the wheels onto the oval tracks. Using silver gel pens, apply the axles and spokes of the wheels, and also make a more expressive edging. Modify the shape of the greenest corner somewhat, using scissors, so that it becomes more like the outline of a tank. Cut off the top and round the tower.

7) Apply glue to the protruding part on the brown part, which we specially cut out for attaching to the craft. Attach the tracks, place the strip under the corner pocket, and smooth it out with scissors.

8) Next you need to add important parts that will complement the silhouette of the combat vehicle. First of all, it is a long barrel. Cut a thin strip of paper and glue it to the tower. Stick a red banner on top. On the body, use pens or felt-tip pens to draw a red star and the number 22 - the license plate of the selected model.


An important date in the history of the Russian people is approaching - 70 years have passed since the victory in the Great Patriotic War. Millions of dead people, pain, suffering - humanity had to endure all this in the period from 1941 to 1945. Throughout the territory of the former Soviet Union, special events and competitions of crafts, drawings and other works dedicated to the 70th anniversary of the victory will be held. Schools and kindergartens should host special classes in which children will become acquainted with historical data and hear the stories of veterans.
That is why in this article we have collected the best craft ideas for Victory Day. After looking at the photo, you can prepare visual aids, make them for veterans, or complete work for an exhibition.
Crochet lovers can make beautiful toys and create layouts from them. Such crafts take longer and more painstaking work, however, they look very beautiful.
1. Knitted soldier. This craft idea will help illustrate the features of the uniform of Red Army soldiers, and will also look original at the competition of works for the 70th anniversary of the victory.

2. Knitted airplane. A variety of aircraft models will allow you to create an entire airborne fleet.

Crafts for Victory Day should reflect some historical events. You can illustrate actions on the battlefield or make a model of a devastated village where civilians once lived. Every city has an eternal flame, which is considered a symbol of memory of fallen soldiers. We offer several options for the layout of the eternal flame with your own hands.
Fireworks were made from a plastic bottle. The carnations in this craft are made of corrugated paper. The pedestal can be made from a small box or cardboard. To make the composition look like a single whole, place it in another box or come up with your own design for a homemade monument.
For work you will need colored napkins, cardboard, glue and St. George's ribbon. Even small children can cut out all the elements.

Modular origami allows you to make crafts of various shapes without extra costs. The main thing is to prepare a sufficient number of modules and carry out the work according to the scheme.

When choosing crafts for Victory Day, decide on the purpose: a visual aid, a gift, work for a competition or an open lesson. On our website you can also find details for some crafts for May 9th.
The postcard is designed to express your attention and cheer up the person to whom it is intended. Postcards for Victory Day have acquired particular significance, because with their help we express our gratitude, respect and eternal memory to those who defended our Motherland! We invite you to make festive cards for May 9th with your own hands using various handicraft techniques.
The easiest way to decorate a postcard, which even small children can handle, is to make an applique from colored paper.
Cards with rainbow carnations
And even a child can do this
Carnations can be easily and simply made from colored paper or napkins.


...and napkins
How to make a carnation incredibly similar to the real one, see the master class ABC TV:

Quilling is the art of making paper compositions, voluminous or flat. It involves twisting long pieces of paper into spirals. The resulting spirals or “rolls” can be used to decorate postcards.
It’s worth starting small, studying the basic elements from which the entire composition is formed:


Photo of the main elements of Quilling from the site vscrape.ru.
Having mastered the twisting of the basic elements, you can assemble simple but original postcards from them:

Beautiful inscription made of small elements

And here is a version with an apple tree branch
Before starting work, you need to decide what decoration elements you have available. Perhaps you have old, unused May 9 greeting cards lying around, or you have the opportunity to print out elements to decorate the card.

Strict postcard...

…Darling…

...and retro
A red star can be cut out of cardboard or felt, or a three-dimensional star can be glued together from paper and combined with other elements:

Star with leaves...

...roses...

...Ribbon of St. George...

...and other decor
Even a small wooden airplane clothespin can be used to decorate a card. Everything is very simple and original!
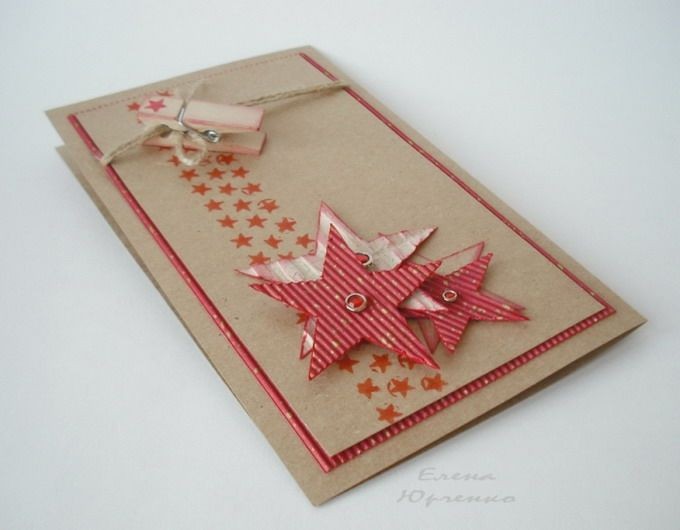
St. George's ribbon made of any materials (fabric, paper) in combination with clippings, floral elements, aged paper will always add brightness and symbolism to the author's postcard:


You can also use a ribbon with the colors of the Russian flag:

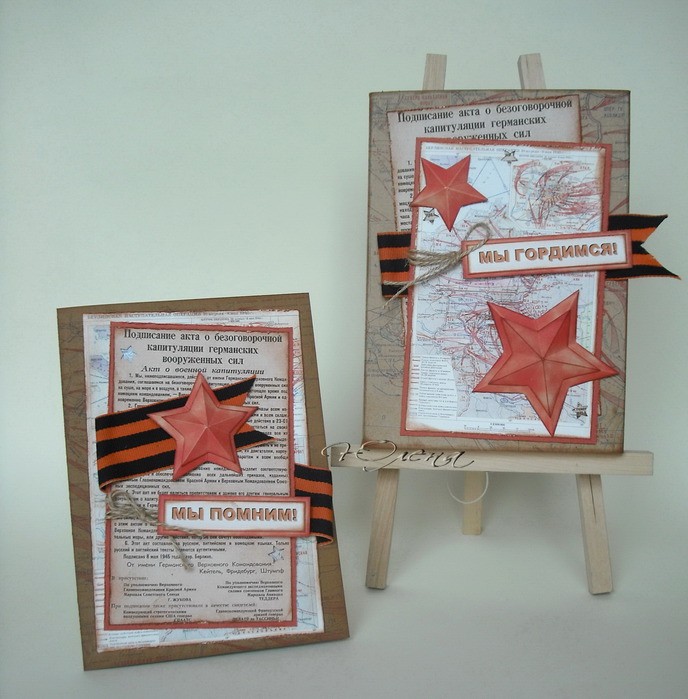
You can “scrape” using glue or sew elements of your story onto a postcard (using a sewing machine or by hand):


Battle maps, military documents such as the “Act of Unconditional Surrender” and others will all draw children's attention to our history when creating a holiday card:
He clearly shows how and from what materials to make such a postcard in his master class. MASTER FOREVER:
You can watch how to artificially age military documents or maps in the master class DIY Creative Ideas HANDMADE CRAFTS:
Decorative elements can be anything that reminds us of the Great Patriotic War and Victory Day: camouflage fabric, stars for shoulder straps, small cartridge cases, patriotic poems, old military letters or artificially aged notes.
In his master class, Podarki.ru shows how to make a scrap card with a gift using camouflage fabric:


Or photos of war heroes, perhaps your close relatives, grandparents...

Don’t forget that May 9 is a holiday, so your postcard can be decorated with joyful moments of Victory Day

If you are good with a brush and paints, as well as colored pencils, you can draw a bright card yourself. For this you can use colored pencils, watercolors or gouache, etc.

First you need to make a sketch using a soft pencil. Next, draw out the main details of the drawing more clearly and begin coloring.

Children's drawing...

...no worse...

...the creations of the masters
Nowadays, you won’t surprise anyone with electronic congratulations. If you want to congratulate someone by email or via social networks, then these cards will do the job perfectly:


Happy Victory Day!


| Related articles: | |
|
Decorating clothes with flowers, embroidery, beads, rhinestones, accessories, crochet, ribbons, applique
string(10) "error stat" string(10) "error stat" string(10) "error... Simple New Year's toys for a Christmas tree made of paper - ideas for DIY crafts with children Christmas tree with a cardboard ball
The crochet Christmas tree pendant can be crocheted in various colors... Postcard using origami technique “May 9”
Galina Shinaeva On the eve of the wonderful holiday of Victory Day, I propose... | |


