Readers' Choice


Popular articles
Whether it’s hot or cold, the headband will decorate any head. Even beginner knitters can crochet a headband with their own hands. Initially, you still need to determine the season for which the headband will be knitted, and also try to combine it with the rest of your clothes so as not to look ridiculous. An openwork headband crocheted from thin threads is suitable for the summer or warm spring season, but openwork will find its place in winter and add romance to your appearance.
A special niche is children's headbands , they look lovely on babies, protecting children's ears from drafts. Taking even the simplest pattern, you can end up with a unique creation due to beautiful little details. For little ones, adding flowers, or bright ribbons, beads or even funny insects to their heads will result in not only a necessary thing, but also a fashion accessory.A hand-knitted headband will warm your baby's ears from the cold and wind.
This item will definitely complement your fall-winter wardrobe, knits up very quickly and will protect your ears from colds. Even beginners will be able to knit such a thing with their own hands in one evening, since the pattern is very simple.
The size is adjusted as you knit, which allows you to knit the product exactly according to the girth of your head.
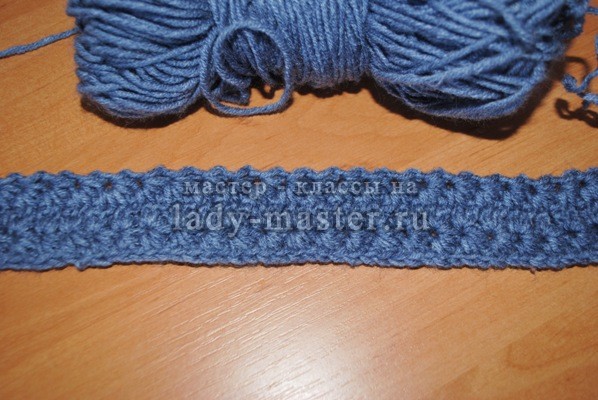
For a head circumference of 56 cm you need 1 skein of wool yarn (110 m / 50 g) and a hook number 2.5.
10 air loops are cast on - this is the width of the bandage. Knitting is done in half columns. Each row should begin with an increase in height due to the additional air loop, and then continue the pattern.
Having knitted strip to the required size, close the loops. And then since tied up strip, it must be connected into a ring by sewing the edges. For the winter version, the decoration will be a small piece of fur in the color of the yarn.
Legend:
○ – air loop
+ – single crochet
– double crochet
– 8 double crochets knitted from one loop
▲ – picot (a knot made up of 3 loops)
I've always noticed how cute little girls look with bright colorful headbands covering their ears. In stores you can find a huge variety of headbands for young fashionistas. And mothers are not far behind. They knit wide multi-colored elastic bands with ribbons, beads or flowers for their beauties. However, girls and women have completely forgotten about this once fashionable accessory. But why? This headdress is perfect for warm windy weather, when it will be a little hot in the hat, but you really want to cover your ears.
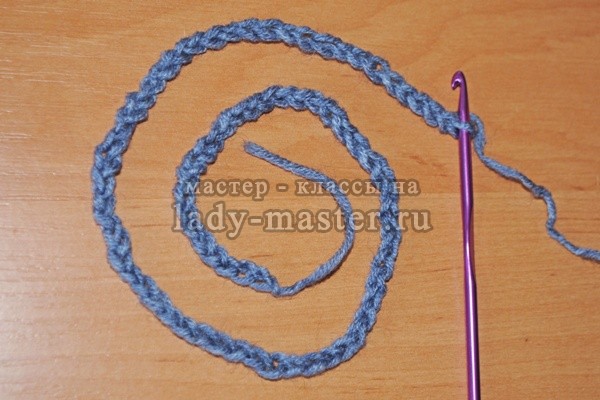
Why not bring headbands back into our wardrobe? Unusual modern products can decorate any haircut and will be an excellent addition to a spring or autumn look. In my master class, I would like to tell you how you can knit an interesting headband that will compete with berets and hats. In addition, this accessory can be made in 1 day. For knitting I will need: hook No. 4.5 and acrylic threads + wool. I used thicker yarn so that the headband could be worn in cool weather.
1. First, I cast on a chain of air loops that will correspond to the circumference of the head. I try it on myself. A chain of 89 loops suited me. Please note that their number must be odd.
2. The bandage is knitted in straight and reverse rows. I start the first row (front side) by casting on 5 new loops on the hook. Starting from the second chain loop after the hook, I pull the thread out of the 5 loops of the braid. This is done according to the principle of making unfinished single crochets: I insert the hook into a loop of the chain, pull out the thread, two loops are formed on the hook, but I don’t finish the stitch further, that is, I don’t tie these loops together, but leave them on the hook and move on to the next loop of the chain.
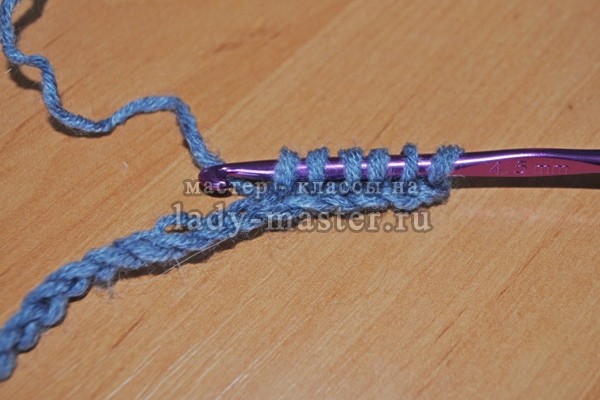
3. When there are 6 loops on the hook, I yarn over and pull it through all 6 loops. I knit a chain stitch so that a hole is formed above the 6 loops.

4. Again I put 6 loops on the hook, but I perform this action as follows: I pull 1 loop from the hole, 1 loop from the last of 6 loops, 1 loop from the air loop into which the last of 6 loops was cast and 1 stitch from the next 2 chain stitches. Total 6 loops on the hook.

5. I put the thread on the hook and pull it through all 6 loops, completing the element with 1 chain loop.

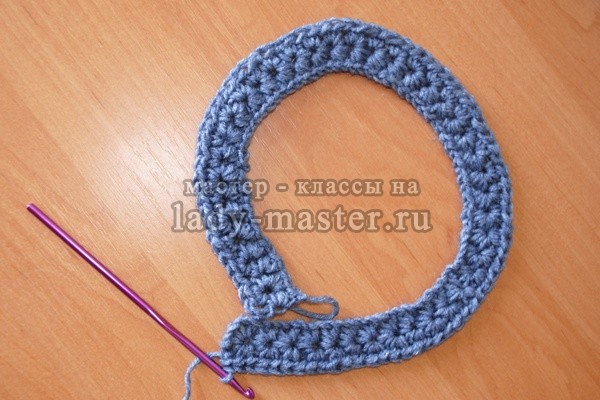
6. According to the pattern described in points 4 and 5, I knit the row to the end. In the last chain stitch I perform 1 half double crochet and turn the work over.

7. I knit the second row (wrong side) like this: 2 chain stitches, 2 half double crochets in the hole of each element. I finish the row with 1 half double crochet in the last loop. I'm turning the job around.

8. In the first row I got 44 “stars” and 2 half double crochets in each hole.
9. I knit the third row (front side) according to the principle of the first. I cast on 3 chain loops, pull out 1 loop from the 2nd and 3rd chain loops from the hook, then 3 loops from the first 3 loops of the row. Total 6 loops on the hook. I yarn over, pull the thread through all 6 loops and finish the element with a chain loop.

10. I knit the remaining stars to the end of the row according to this pattern: I pull 1 loop from the hole, 1 loop from the last of 6 loops, 1 loop from the same loop into which the 6th loop was cast and 1 loop each from the next 2 columns of the previous row. There are 6 loops on the hook.

11. Yarn over, pull the thread through all 6 loops and make a chain loop.
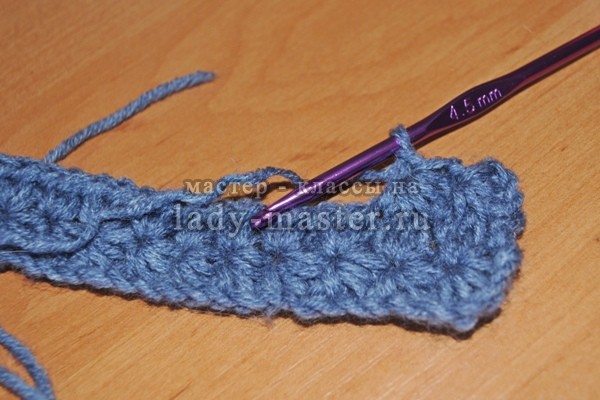
12. Having completed the row, I make 1 half double crochet in the last loop and turn the work over. Next, we knit purl rows following the example of points 4, 5, 6 and knit rows in accordance with points 9, 10, 11,12.
13. We complete the product with a purl row. The number of rows will depend on the desired width of the bandage. I made 8 rows.

A headdress such as a crocheted yarn headband for women is very comfortable and practical. We offer a number of simple lessons on how to do this. Each headband sample is provided with a detailed knitting pattern and instructor comments on its specific implementation, so it will not be difficult to achieve success.
After completing the training, you will be able to create a beautiful headband for yourself, simple or with a complex pattern, single-color or variegated, matching it to your own clothes. The headband can be created in the same style with a knitted sweater, dress or cardigan, completing a harmonious set of clothes. So, let's see what options there are for crocheted headbands.
p.s In the last article we looked at how to knit with knitting needles
The yarn used is acrylic, for children's knitting. The size of the bandage depends on the thickness of the thread, so you must first measure the child’s head. It seems that the headband is simply tied in a knot to form a bow, but this is not so: it consists of two parts.
The first is the bandage itself, which is looped and knitted in the round. In one place it is simply tied across with thread and tightened. Next, the second part is knitted, a small narrow strip, with which the bandage is intercepted in the place tied with thread. Just one knot is made, and the ends of the resulting bow are carefully straightened.

The headband with a spectacular crossover in the front is knitted to fit the size of the head, a little smaller so that it fits snugly. The master class tells that the bandage is knitted in the transverse direction, and the final size depends on the number of rows. Closer to the center, all loops are divided into two parts, and knitting continues on only one side for approximately 10 centimeters.
The second half of the loops is knitted, forming a second strip of the same type. Then the stripes cross and normal knitting continues until the end. Next, the free ends of the bandage are connected to each other, and you get a beautiful headdress that will decorate you and warm you in the cold autumn time.

An original cute headband, not too wide, but with a pair of round ears in the Mickey Mouse style. A small red bow is attached to one of the ears. If you do not do it, the bandage can be useful not only for a girl, but also for a boy. This aesthetic headband isn't particularly warm, so it's not so much about keeping you warm as it is about decorating. The bandage is knitted crosswise, in short rows, to a length determined by the size of the head.

The headband is knitted from thick yarn consisting of wool with the addition of polyamide. The headband is knitted in a ring, half double crochet without a seam, and the number of loops is determined by the circumference of the head for which the item is being made. The width of the headdress depends on the number of rows knitted. When the bandage is ready, a chain of air loops is knitted.
This chain pulls the bandage across several times, creating the impression of a bow. This amazingly simple element gives the headband a beautiful look. The tightening is done gently so that the knot does not put pressure on the head and the bandage sits comfortably.

Let's look at how to knit a headband with two pointy cat ears. The headband itself is knitted with a spider pattern. The edges of the headband itself and the ears are tied with a thread of a contrasting color (in this case, white for a dark blue headband). The headband is knitted in longitudinal rows so that the number of loops is determined by the size of the head.
The ears are knitted as separate elements, edged with contrasting thread and sewn onto the overall fabric of the headband. There is a separate pattern for knitting ears, described in detail. All that remains is to loop the bandage and tie it along all edges with a contrasting thread, which greatly decorates the overall appearance of the item.

The hat is knitted in the round, and already from the second time a pattern begins to form, which, in the end, gives the impression of a series of hexagonal patterned rosettes connected to each other. The bandage is not wide; it has a decorative appearance rather than serves to keep you warm. Its task is to hold the hair in place.
The finished bandage is connected into a single ring with a thread of yarn using a hook or a needle. A beautiful five-petal flower is knitted separately and attached to one of the rosettes of the headband pattern. This decoration greatly enhances the look of the headband and turns it from a simple support strip into an original accessory.

The work begins with measuring the circumference of the child's head or selecting it from a table depending on his age. A detailed knitting pattern is provided. First, a narrow strip with square holes is knitted along the entire length of the bandage. A decorative ribbon will later be threaded into these holes.
The resulting strip is tied with columns of a different color, which will hold the columns of the openwork pattern. Next, the second side of the existing strip is tied in the same way. The following describes in detail how to knit a flower that will serve as decoration for this entire original headband.

The headband has a dense middle part, with small holes in the center, quilted with a ribbon from which a beautiful bow is tied. A pattern of arches is formed on both edges, turning into one another, leaving voids underneath. This warm headband is both very beautiful and unusual.
As an additional decoration, a complex three-tiered flower of a contrasting color (preferably red) is used, which is sewn onto the headband next to the bow on the ribbon and located slightly away from the center. You can additionally sew a leaf of green yarn under the flower.

This knitted headband is made in openwork. It is knitted in transverse rows so that the elements of the pattern alternate with gaps, and as a result, when the number of rows reaches such a number that the headband reaches the size of the head circumference, all that remains is to connect its ends together with a thread so that the seam line is invisible.
You can attach a knitted flower to the front of the headband, which will greatly decorate it. This headband will not be hot; it can be used not so much for insulation as for decoration, and also in the summer to simply keep your hair in order.

This is a very simple headband, quite accessible to knitting even for beginners. The yarn is taken quite thick. The number of loops that are cast on to knit a headband is determined by the size of the head. It is enough to measure the number of loops you have cast on, slightly shortening it to the size of your head, since the bandage will be a little elastic and should fit tightly on your head.
Next, the intended pattern is knitted in half-columns. It is explained in rows, and there are seven rows in total. It is not difficult to repeat the pattern, but it turns out beautiful. Next, the ends of the bandage are connected to each other, and with the remaining thread the bandage is tied across, and the appearance of a bow is obtained.
A crocheted headband is an original accessory that is suitable for girls of different ages, starting from birth. Christenings, birthdays, kindergarten matinees, school balls, photo shoots, weddings, summer holidays – isn’t this a great occasion to decorate your hair in an original way?
We are fulfilling the request. And we remind our readers that you can subscribe to the site’s news at the end of any article, ask a question in the comments, leave a request for material that will be published in the near future on the site - here.
Did you know that even a novice needlewoman can knit a beautiful openwork hairband? If you know the basics of crochet: you know how to cast on air loops, knit single crochets and double crochets - feel free to get to work! You will succeed! We bring to your attention several simple patterns for knitting headbands for girls (suitable for any age), which even a novice needlewoman can handle.
To knit a headband, we only need one measurement - head circumference. We take measurements with a measuring tape around the head. The resulting number is the length of the bandage, the width is optional.
If you are new to knitting, you must first knit a control sample of the selected pattern, which will make it possible to correctly calculate the width and length of the bandage and in the future you will not have to unravel and re-knit the entire product.
The crochet headband is crocheted full width vertically from bottom to top and/or top to bottom.
Method 1: bandage without seam. A chain of air loops is cast on (the number of loops is calculated according to the control pattern: the number of air loops in 1 cm is multiplied by the measurement of the head circumference), then the knitting is closed in a ring and the headband is knitted in a circle. The disadvantage of this method is obvious - you need to be able to accurately calculate the initial number of loops.
Pay attention to the photo below. You need to cast on the required number of air loops, a multiple of the repeat of 9 loops, close them in a ring, knit according to the pattern from rows 1 to 5, and break the thread. Then knit from the 1st to the 5th row on the other side of the chain, so that the pattern is a mirror image.

Method 2: bandage with a seam. A chain of air loops is cast on (the quantity is calculated according to the control pattern: the number of air loops in 1 cm is multiplied by the measurement of the head circumference), the first row is knitted, then the knitting is turned to the other side, the 2nd row is knitted, etc. The finished product is sewn along the short edges . A strip sewn into a ring is tied on both sides with a beautiful pattern, for example, with fans made of columns with one or two crochets. For decoration, knit a flower according to the pattern and sew it on. Tape is inserted into the slots of the posts, as in the photo below.

The next bandage is knitted similarly to the previous one: the cast-on chain is tied on the top and bottom sides. First, a strip is knitted according to pattern No. 1, equal in length to the circumference of the head, then the knitting is turned over and the pattern according to pattern No. 1 is again knitted into the initial chain. Patterns No. 2 and No. 3 are a decoration in the form of a knitted flower.


When using this method, the bandage is crocheted from one side seam to the other. This type of knitting is most suitable for beginners - you can easily adjust the width of the headband at the very beginning of knitting. The same goes for the length - thanks to fittings, you can knit a headband that is exact in size.
Method 1 – bandage with a seam. A strip is knitted, the length of which is equal to the circumference of the head, then sewn into a ring along the short edges with an invisible seam. Then the bandage is tied on both sides with “fans”. For the flower, knit a strip according to pattern No. 2. Gather it onto a thread along the bottom edge and sew it to the bandage.


Here is the same knitting pattern, but without the flower:

Tip: to prevent the bandage from slipping while wearing, you can thread a thin satin ribbon through the holes that are formed when knitting the bandage. This will make it possible to fix the size of the accessory.
Method 2 – bandages with an elastic band. Using a hair tie allows you to securely fix the headband on your head. The circumference of the head is measured, and the folded length of the elastic is subtracted from this measurement. The resulting measurement is the length of the strip that needs to be knitted.
Patterns for stripes can be different. Ideas and patterns can be taken from any knitting magazine (for example, below is a photo and pattern from a Japanese magazine - beads were used, but of course you can knit without them):


The finished stripes along the edges can be tied with another pattern, for example, as handkerchiefs are tied:
 An elastic band is knitted at the beginning and end of knitting, for example, as in this diagram:

Pay attention to the further design of the hair tie - it needs to be tied with single crochets (as in the photo above) or wrapped with thread in the middle, as here:

Or you can sew an elastic band to a ready-made knitted part of the headband, like here:

Here's another knitting pattern:

Beads, beads, buttons, knitted/fabric appliqués and flowers can be used to decorate headbands. You can choose applique knitting patterns, flowers - in this.
As you can see, knitting a headband for a girl is very simple. If you show your imagination, you can combine knitting and decorative methods, thereby getting an original handmade accessory. Don't be afraid to experiment and create new products with your own hands!
p. s. All diagrams used in the article are taken from open sources on the Internet for informational purposes and do not claim authorship.
Evgenia Smirnova
To send light into the depths of the human heart - this is the purpose of the artist
Content
One of the cutest accessories is a headband for girls. Creating such an original piece of clothing interests many mothers, because everyone wants to create something special for their child. If you are eager to crochet a headband for a girl, check out the tips and tutorials below.

Beginning needlewomen are recommended to divide the entire process of creating a headband into stages. The first step is to choose the right yarn and prepare the necessary tools. As for the material for knitting, the specific option depends on the purpose of the finished product. If some kind of celebration awaits you in the near future, take cotton threads of predominantly light shades. Bright acrylic yarn is suitable for the summer heat. To take your baby for a walk in spring or autumn, buy woolen threads.
Additionally, decorative elements may be required, for example, sequins, beads, buttons or rhinestones. Among the tools, the main one is the hook. Its number is selected based on the type and thickness of the yarn. Beginners in the field of knitting should give preference to a product with a wooden handle. In addition to this you will need:
If all the necessary materials and tools are prepared, start taking measurements. Using a centimeter, determine the circumference of the baby's head. This will be the required length of the product. The width is made according to your wishes. For babies up to one year old, it varies between 33-35 cm. After taking measurements, make a control sample to see how well the dimensions were determined and the pattern chosen. To ensure that your headband is crocheted efficiently the first time, follow the instructions exactly.
In the process of creating a dressing, one of two methods can be used. The first is longitudinal knitting, in which the product is seamless. The operating principle is as follows:

Here the knitting occurs crosswise, i.e. from one side seam to the other. The principle of creating a product is to set a chain of air loops of such a length that corresponds to the width of the finished product. Then the first row is knitted, the future accessory is turned over, and the same steps are repeated until the product reaches the length of the head circumference.
The finished item is often tied with a hair elastic, which is inserted at the beginning of knitting, or you can simply sew the short sides together. Then all that remains is to decorate the product with decorations to your taste. Often they are small or large flowers, for example, roses. It's easy to link them:
| Related articles: | |
|
Decorating clothes with flowers, embroidery, beads, rhinestones, accessories, crochet, ribbons, applique
string(10) "error stat" string(10) "error stat" string(10) "error... Simple New Year's toys for a Christmas tree made of paper - ideas for DIY crafts with children Christmas tree with a cardboard ball
The crochet Christmas tree pendant can be crocheted in various colors... Postcard using origami technique “May 9”
Galina Shinaeva On the eve of the wonderful holiday of Victory Day, I propose... | |


