Readers' Choice


Popular articles
It is better to prepare for the New Year in advance. Making your own bells for the New Year tree is a good idea. Even in the writings of ancient authors, the ability of bells to ward off evil forces was reflected. There are many options for making bells from scrap materials. We have selected the most original of them.
We will need:

Take the shell and bandage. We glue the bandage “overlapping” with PVA glue.

We strengthen our bell, it should dry well.


Prime with white paint so that the shell does not show through. When the bandage is dry, cut out the petals with scissors.

Make a hole at the top with a sharp object. The hole is needed for the lace. Glue the husk on top and paint it.

The bells are painted with Easter dyes + watercolors. The leaves of the bells can be safely bent back.

We take the shell, bandage and PVA glue. We glue the shell inside. This is also a way to strengthen the shell. Let it dry on the battery. Then we cover the outside with white paint.

We cut off everything unnecessary using scissors. Easy to cut.

Afterwards we apply putty and you can paint it with a pattern. Let it dry. We paint and go over the bulges with gold paint. Make a hole at the top for the lace.


You can decorate the top with beads, you can make a “spraying” of semolina. Coat the top with a brush of glue and sprinkle with semolina. Let's use our imagination and make a toy.


For 1 bell you will need:

Tools:


We will need:
Take two plastic cups (you can use yogurt cups). We spray paint the cups and the spruce branch. The color can be any: golden, silver, bright red.

While the cups are drying, prepare the decoration. You can cut flowers from lace and guipure. We sew beads into the middle.

We coat the flowers with glue and attach them to the bell.

We wrap the edges with yarn.

We take a beautiful ribbon, gather it in the middle with a thread and a needle and make a lush bow.

We fasten the bow with a needle and thread. We hang them on the tree or glue the bells together at an angle, glue them to a spruce branch and hang them with tape on the wall.

New Year is the most joyful and magical holiday. Preparing for it brings a lot of pleasant troubles. To create a fabulous atmosphere in your home and give yourself a festive mood, you can start making New Year's crafts. Making them with your own hands is simple and interesting. Involve your children in this entertaining hobby so that they don’t get bored and also prepare for the main winter celebration. Try making your own New Year's bells together
 The custom of decorating a home with bells came to us from Europe. There was a superstition that their ringing could scare away evil spirits. To prevent dark forces from interfering with New Year's celebrations, bells were hung on the Christmas tree along with other toys. This tradition has taken root well all over the world. And today even people who are far from superstitious decorate their houses with bells for the New Year and Christmas. Because it's very Beautiful holiday souvenir.
In those distant times, people made huge bells from bronze. They were used not only as amulets, but also as a signaling tool. The bell notified the population about various events or called for a meeting. Nowadays this signal is used in educational institutions. Every September 1st the first bell rings, and before the summer holidays we hear the last school bell. So we can safely consider the bell as symbol the beginning of another year.
New Year's crafts can be made from various available materials. For example, from paper or cardboard, from a plastic bottle or disposable cup, from fabric or rope. The bell shape can be knitted, woven from beads or using the papier-mâché method. Excellent crafts are made from spruce and pine cones, ts twig pots, foam, egg trays and shells.
 In a word, a souvenir can be made from any assistants materials similar in shape to a bell. Therefore, look for items in your home that have not yet found use. Thanks to simple master classes, they will turn into bright, original Christmas tree decorations.
First, let's figure out what any bell should consist of:
Since we have a New Year's souvenir, we will need all kinds of thematic decorations. For additional decor you need to take: pine branches, tinsel, sparkles, rhinestones, beads, sequins, lace, ribbons and bows. You can use a special figured hole punch with the shape of a snowflake or star.
 The simplest crafts are made from paper or cardboard. You can take white landscape sheets and then colorize souvenir. It is more convenient to use colored paper and cardboard. The following tools are useful for working with them:
Let's make a three-dimensional Christmas tree toy out of paper step by step. For this you need colored paper (yellow, green, red), woolen thread and large beads.
Instructions:
Now the cute bell is ready. They can decorate a Christmas tree or hang on the wall.
A cardboard craft will become an original decoration for every Christmas tree. Prepare a cardboard sheet, scissors, needle, yarn and decorations.
A step-by-step diagram will tell you how to make a bell from cardboard:
 Plastic cups are an excellent inexpensive consumable for all kinds of crafts. You can also use unnecessary plastic soda or milk bottles. Small glasses make wonderful Christmas tree bells. The shape of the bottle is larger, so it is better to use it to make a decorative decoration for the interior or a toy for a very large Christmas tree.
What materials are needed:
Let's start the master class:
 A bright New Year's bell is ready to decorate your home. It can also be made functional. Take a small real bell and use universal glue to attach it inside the craft. Now the New Year's souvenir will be able to make a beautiful ringing sound.
The cut half of a plastic bottle is decorated in different ways. You can leave it transparent and cover it with miniature stickers, wrap the bottom and lid with tinsel. If you make a hole in the lid with an awl, you will be able to hang the bead on a ribbon and also make a loop.
The surface of the bottle can be coated with paint, and then lacy lace can be glued on. We decorate the lid with sequins and add a pendant made of a thin ribbon.
Try making Christmas decorations from cups.
Collect the following set of items:
 Let's start doing the craft:
Instead of ordinary plastic cups, you can use yogurt containers. Now let's make a silver bell to decorate the Christmas tree. You will need: a glass, foil, tinsel, lace, scissors, an awl and a hook.
 Not only Christmas decorations are made from cups. You can even make a whole New Year's tree from this simple material. You can make a Christmas tree out of cups if you fasten them together with a stapler. To do this you will need many identical green glasses. The finished design is decorated with beads, seed beads and rhinestones.
To prevent egg shells and trays from going to waste, make colorful New Year's toys out of them. Shortly before the New Year, start collecting the necessary materials at hand. Try to break raw eggs not in the middle, but from the edge. We should have complete molds for the bells.
 For the craft, take eggshells, gauze (bandage), thick thread, PVA, paints and a brush. For decoration, you can add semolina, beads or putty.
There are two ways to make a Christmas tree toy from a shell.
Manufacturing method No. 1:
Manufacturing method No. 2:
For a MK with a cardboard tray for eggs, you need to take colored paper, glue, scissors, and string.
If you start collecting colorful candy wrappers from foil in advance, you can replace colored paper with them. You will get very beautiful shiny bells.
Make your Christmas tree truly festive and different from others. The green beauty, dressed up with her own crafts, will look cool and original. Let's try to make a few more New Year's toys from different materials.
Let's take clean flower pots and start decorating them:
A DIY bell craft can be successfully made from linen thread. We take twine, a plastic bottle, a bag, PVA, tape, a glue gun, scissors and decor (beads, ribbons).
We prepare a mold - a real bell, glass or other similar object. We will also collect the following consumables on the table: paper, paste or PVA, cling film.
Papier-mâché bell master class:
To knit bells and make them from beads, you will need special patterns.
Choose any method to create a New Year's craft. Decorate your Christmas tree and interior with bells and use them as gifts for family and friends.
Attention, TODAY only!
Decoupage(from the French découper - “to cut out”) is a way of decorating objects by gluing on them various motifs or images cut out of paper and suitable to the artist’s artistic intent. Using the decoupage technique, you can create things of stunning beauty! It could be something completely new - for example, a New Year's toy in the form of a bell made from a plastic bottle. Having created such a thing yourself, you can present it to friends and family as an interesting gift.

1. Preparing the mold for the toy
From any plastic bottle (carbonated drink, milk, etc.) we cut off the top part about 14-15 cm long with scissors.


2. Preparing the surface for decoupage.
It is better to degrease the surface of the bottle before starting work. Simply wipe with a cloth or napkin, sprinkling the surface with any alcohol-containing substance (both vodka and glass washing liquid are suitable). After this, apply acrylic primer in two layers. After applying each layer, dry thoroughly. You can speed up this process with a hair dryer.
The first layer of primer can be applied with a wide flat brush, and the second layer can be applied using tamping movements with a regular dishwashing sponge. After drying, the primer can be sanded with sandpaper, after which another layer of primer can be applied, so we will achieve greater smoothness.


3.Coloring with background color.
After the primer has dried, we cover our form with acrylic paint of the background color (our color is blue). Apply two layers, allowing each layer to dry.


4.Preparing napkins.
We cut out the desired motifs from decoupage napkins. Separate the excess layers of paper.
Note! Typically, napkins for decoupage are two- or three-layer. For gluing, we only need the topmost, colorful layer of the napkin.


5. Gluing the napkin.
We apply the top layer of the napkin to the place where, according to our plan, the design should be located and coat the top with decoupage glue from the center to the edges. Let it dry. The glue saturates the napkin and the image is firmly fixed on the jar.
Note! This gluing method, the simplest, is suitable for decorating small surfaces and gluing small design elements. For gluing large surfaces, the most commonly used method is transferring a napkin to the surface through a plastic film.

6. Protective varnish coating.
To protect the surface we apply acrylic varnish.
7. Additional decor.
We dip the bottom edge of the bottle into a prepared container with boiled salt to give an edge in the form of frost.
Alena Turyeva
A wonderful and long-awaited New Year holiday! Children and adults are looking forward to it, with that sweet feeling with which children wait for gifts and fun. If you decide to prepare original DIY Christmas crafts, then start right now - time runs forward without looking back, 2017 will come very soon.
Bells or balls! That's what they told us at school. For the New Year, both in schools and kindergartens, parents make New Year's crafts. Just like we did last year New Year's ball, then in this we decided to do bells. The idea of how to do it came immediately. I made the ball out of thread and bells I decided to do it using the same technique.

So. will do bells made of threads(you can use floss). They will be elegant, airy, bright and will decorate your home interior for... New Year. To work for us will be needed: a sheet of whatman paper (wallpaper or the like), scissors, office glue (PVA glue, hot melt adhesive (you can replace it with any other glue), cling film, skein blue thread(you can use any color, ribbon (depending on what kind of bow you want, wide and thin braid, ready-made bows (you can make it yourself, New Year's beads(decide the size yourself, decorative decorations of your choice, tape, plastic cup.
Take a sheet of cardboard or wallpaper (depending on what you have on hand) and make two frames in the form of a cone. Secure with tape.

To prevent the glue from sticking to the paper, we wrap the cones with cling film.

To prevent the cone from bending, I stuffed it with wallpaper scraps.

Now we take a plastic cup and make two holes at the bottom and thread a thread through it. Pour office glue into a glass.


It turns out that there will be glue along with the thread. We wind the thread around our cone.

One cone is ready, take the next one. Let the cones dry (I placed it near the battery)
When the threads have stuck together and dried, we remove them from the frame. We remove it carefully, as if breaking out the frame. We got two cones from thread.
It's time to decorate. Along the edges of the cone we glue a wide band with hot glue.

Then we take a thin braid and glue it a little higher.

Here's how I did it. Take the second cone and do the same.

Next decoration - New Year's beads(I had them in silver). Cut it and glue it onto a cone in the shape of a ball.

Decorate with bows. I bought them at the store.

To make it bells they need to be connected to each other. We thread a thin braid through the hole and tie a knot, fixing it with glue.


This is what happens

Let's make a bow. We take a ribbon and glue thin tinsel along the edges.

We tie a bow and in the middle of it we make another bow from a wide braid.

Glue it in the middle of the resulting bow New Year's beads in the shape of a ball. We tie the cones and tie a bow to them. Here are my most beautiful ones ready bells!


If you liked master-class don’t forget to vote) Thank you.
Publications on the topic:
Inspired by our exhibition for Victory Day, parents asked to give them a master class on making crafts. I tried to make it.
Master class on making New Year's crafts "Christmas tree" Beads, firecrackers and a star sparkle on the tree. We love our Christmas tree - Yes, yes, yes! N. Naydenova.
Master class on making a craft “Flower for Mom” We won’t buy a gift for mom, we’ll make it ourselves. You can embroider her a scarf.
Very soon we will celebrate perhaps the most important holiday not only in our country, but throughout the world - Victory Day. He gave it.
Hello my dear! Every year, both in kindergarten and school, an autumn festival is held, which is accompanied by an exhibition of crafts.
To make a basket we will need: 1. Two sheets of yellow and green corrugated cardboard. 2. Scissors. 3. Stapler. 4. Stationery.
We are developing the theme of professionally made, but so cozy DIY Christmas tree decorations, which turned out to be much more extensive than one could initially imagine. In fact, you can create hundreds of absolutely amazing things from inexpensive materials and recycled materials.
15. Bell or Christmas tree- whoever likes it more.


If the bottom of the base is solid, we cover it with a round piece of dense material, for example, craft felt, with a pendant exactly in the middle. If the base is hollow, we paste over the inner area of the cone.

Next, we decorate the toys at our discretion with anything from beads and sequins to beads and miniature pom-poms. Don't forget to attach a loop on top for hanging on the tree. If the base is made of foam plastic, the loop can, in principle, be secured with a pin.
.jpg)
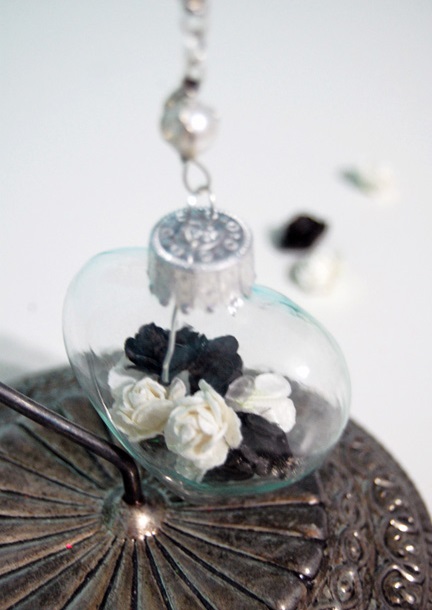
16. Scenes and individual elements in transparent balls.


Expanding transparent plastic shapes - including balls, apples, hearts, etc., etc. - provide vast scope for imagination and handicraft on the theme of Christmas tree decorations. Such balls are sold in sets for pennies through foreign stores (AliExpress, eBay and others), here also (in RuNet), but as much as a set costs there, 1 ball costs us. Although, as girls from other cities write, similar Russian-made items have already appeared at a much lower price - also in sets. Moreover, there are two types of balls: those that open from the top (removable “crown”) and those that open into 2 halves. Choose depending on the future content.


In balls, you can recreate entire scenes, glue together landscapes from three-dimensional parts, fill the balls with paint, glitter, colored balls and anything else of appropriate weight and size that you could never hang on the Christmas tree in its original form. To help, hot glue (and any other suitable materials) glue, paint, glitter, small toys from children's sets with animals and houses, bridges and lanterns, artificial fir branches, and also, as usual, craft felt, tinsel and bright ribbons, colored paper and cardboard, polystyrene foam and foam rubber (from the latter you can cut out various shapes and then cover them with fabric), etc., etc.


.jpg)


Paint mixed with glitter, or just liquid glitter, is poured inside and rolled around inside the ball until all the walls of the Christmas tree decoration are evenly painted.
You can use decoupage on such balls (as well as on unnecessary ordinary plastic ones), a drawing with 3D paint, you can draw a simple pattern on top, stuff bright ribbons inside, you can paste them with pieces of disks (to make it easier to cut the disks, heat them a little in the oven) - in fact, the ideas here are seemingly countless.


Three-dimensional snowflakes, fabric flowers, sprinkles, Lego parts and bright pom-poms, Styrofoam filling, candies and, in short, anything else are placed and hung in transparent plastic balls!
.jpg)


17. The next idea is Christmas decorations made from cardboard circles “dressed” in fabric.

How to make such elements (called “yo-yo”) - we read on the basis of coasters. The elements are ready - glue the circles together slightly overlapping with hot glue. Then we add details from craft felt and other simple materials to the figures.
18. Hard wire toys.


Bend simple shapes from fairly stiff wire (snowmen, stars, gifts, bows, etc.), then simply wrap them in short-haired Christmas tinsel! Or apply glue and drop into a bag of glitter.

19.Christmas trees on a cinnamon stick.

Indescribable charm, which also spreads a festive feeling throughout the house. Take 1, across it, starting from the very top, fix a small artificial spruce branch with hot glue, below another one - larger and with a small indentation, and again below another one - even longer and with the same indentation. We decorate the Christmas tree with beads, sequins, small bows, bright buttons and other things as desired.
To be continued. The upcoming articles in the series will be devoted to felt Christmas tree decorations and decorating plastic balls.
Sources including:
www.craftpassion.com
www.theornamentgirl.com
| Related articles: | |
|
Haircuts for long hair: creative ideas Creative women's haircuts for long hair
So, it's time to radically change your image. What to do, if... The meaning of a pit bull tattoo in men and women What does a pit bull tattoo mean?
A harmonious and at the same time beautiful tattoo is a real... Is it possible to pierce at home?
Many centuries ago, wild tribes were fond of body punctures. But they did... | |


