Readers' Choice


Popular articles
Beautiful DIY decorative pillowsNo matter what fashion designers come up with, no matter how far progress advances, there is no way to do without this item. After all, it contains comfort, warmth and healthy sleep for a person. Moreover, modern pillows can please both adults and children with their unusual appearance. Indeed, lately a variety of scops owls, hugs and just pillow toys have become very popular. And one of the most favorite is the cat pillow, which you can quickly make and enjoy from it, like a real purring kitten.
Cat pillow
If a person has accumulated irritation or fatigue, then he should not be upset. After all, any negativity, any negative emotions will leave him, as soon as he picks up the cat. All scientists have already proven that it is the best antidepressant. But inventive mothers made an incredible discovery: if it is not possible to have a live animal, then it can easily be replaced with an anti-stress toy, amazing in its simplicity and originality, in the form of the same four-legged friend.
Neck bolsters with funny faces
An anti-stress toy is a great gift for children. The bright colors and unusual shape of this product will definitely please your child. And if made with your own hands, it will be absolutely safe for a baby at any age, because the mother will use only high-quality, non-toxic materials to make it, avoiding sharp, inconvenient parts.
In addition, an anti-stress toy can become an invariable element of any interior. It will not lose its fresh appearance over time. A pillow made with love will be moderately soft, comfortable and light so that the child can carry it from place to place. And the right filler will make it resistant to sunlight, washing and moisture. Therefore, it will not fade, fade or become damp. And the appearance of the kitten will definitely be very cute and kind, so that the child grows up in an atmosphere of happiness and joy.
Orthopedic cat
Knitted cats
For many years now, knitting has not been associated with a “grandmother’s” activity, but has become a way of creating bright, unusual things, including toys and interior items. And for those who decide to embody their love for mustachioed and striped animals in a craft, you can do this with the help of threads and knitting needles. You can, for example, take the heroes of good Soviet cartoons as an idea - Leopold, Matroskin, a kitten named Woof. Their cute faces are very easy to translate into knitting, fabric and any other material. And besides, they will evoke the kindest, brightest feelings in the baby.
funny balls
Cute fluffy. The kids will definitely like this one
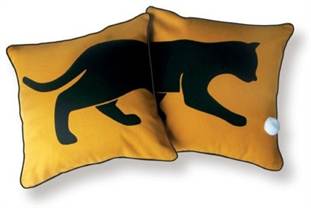
These original sofa pillows in the shape of cats can be knitted.
For work we will need:
- Knitting needles of medium thickness.
- Any threads, leftover threads (you can take threads of two colors and combine them).
- White threads for paws.
- Synthetic padding for stuffing pillows, hands and feet.
- Two buttons for the eyes, a piece of fabric for the nose.
We knit either two squares, or a rectangle, which, when we fold it, will turn into a square. The size of the pillow can be any, the smallest is 35/35 centimeters, you can make it larger. The paws are approximately 28 centimeters. How many loops to cast on: knit a little on the knitting needles and look at the number of loops in 1 cm. Multiply by 35 cm.
Knitting pattern
Option 1: stockinette stitch.
- Row 1 - knit only,
- Row 2 - purl only.
Option 2: confusion.
- Row 1 - knit - purl - knit - purl, etc.
- Row 2 - purl - knit - purl - knit, so that the knit is always above the purl, and vice versa.
The front and back paws and tail are knitted using stockinette stitch. We knit the required length, first we make decreases (we knit two loops together and tighten the rest with thread).
On the other side, we knit the paws: we knit three from each loop with white threads to make a white paw. You don’t have to stuff the length, but stuff the hand and foot with synthetic padding and embroider the fingers. We decorate the face with applique. We sew the pillow, leaving a slot for the padding polyester. We stitch the ears and stuff them with padding polyester. The cat is ready
Try to sew these cute animals that will live on your sofa
You can sew a pillow that will represent only a cat's head. All you have to do is finish drawing the eyes, nose and mouth
Cool pillows in the shape of cat faces
Another version of the cat's head
This cute toy will please others and decorate any home. Making it this way is also absolutely easy. For work you will need the following materials: a piece of fleece, padding polyester or other filler, threads to match the color of the fabric and black threads. You also need to prepare a needle, scissors and a pencil. And, of course, you can’t do without a good mood.
More cats with patterns
The patterns are quite simple in shape. The image of the cat itself is completed or embroidered after
Simple but beautiful pattern
This cute little thing can be sewn either by hand or on a sewing machine. You can also introduce children to sewing, who will happily participate in the work, happily helping their mother.
After making a pattern from paper (40x50 cm), you need to fold the fabric in half and cut out two even parts, not forgetting about the allowances (1 centimeter). In addition, you can immediately draw a nose, mouth and eyes on the fleece. Then they need to be embroidered on the front part, where the muzzle will be, using black thread using a stem stitch. Although the nose can be sewn on from a piece of felt. A tail is sewn or embroidered on the back half. All that remains is to sew both halves together, leaving an opening for turning. After stuffing, the product can be sewn. And if you like handicrafts, you can make a whole company of several funny soft animals.
Handmade home decorations are all the rage these days. All kinds of textile accessories help to create an atmosphere of harmony and comfort very well. This very simple product will look fun and unusual. Even a novice needlewoman can handle making a soft sofa guest.
Use the list below to create a beautiful cat pillow:
So, you don’t need anything special to make a cute souvenir. You probably have some small scraps at home. Any workpiece can be made even from several parts, it will just require more seams.

In order for you to get an original cat pillow, the pattern must be appropriate. First of all, you need to choose what your product will look like and find the appropriate template. If you want to take the blank you like, simply print it on a printer at the desired scale. If the element does not fit completely on the sheet, divide it into two or more, and then glue it with tape.
Consider your experience, if you are a beginner, try simple schemes. Below are templates designed for beginner craftswomen, so you can safely choose any option.
To make a simple accessory, you need to do the following:
Work always follows this pattern, regardless of the complexity of the product. The technology differs in the number of seams that need to be made. The simplest thing is to connect two identical parts in the form of a cat's silhouette.

In this case, you will actually only make one seam unless the tail is made as a separate piece. In the picture below, the pattern also suggests the presence of a side part in the pillow. For this purpose, two additional stripes are made. So, the product can be given more volume.

Although it is enough to simply sew two parts.
If you don't like to stitch along arched lines, you can choose a very easy method. You can quickly and effortlessly create a cat pillow with your own hands. There is no need to make patterns here at all. The base is made in the form of a regular rectangle or square, and ears, tail and muzzle details are sewn to it.

If you choose a material with cat themes and patterns, you will get an original, eye-catching bright accessory.
If you have no problem stitching along a rounded line and want your DIY cat pillow to be more realistic rather than looking like a square “bag,” use the following templates.
The first option is performed as one piece with the tail and ears. In the diagram, the arrow indicates the direction of the grain thread, although if the size of the fabric does not allow the part to be positioned exactly this way, do it as best as possible. This is not a dress, but just a small accessory. The seam allowances and the line where the stitching is performed are also indicated. An opening for turning and filling is left on the side.

The second option is a great idea. The outline of the product is very reminiscent of a heart, and additional decorative stripes of the same shape can be used in any quantity and size.

In the third sample, the tail is made as a separate part and sewn to the base. You will need to cut out two parts of each element.

Another cheerful option is the head of an animal with an emotional one, which can be either cheerful, happy, or sad, causing tenderness.

Using such a blank, you can make only the base itself voluminous, and sew or glue the remaining parts flat. But it’s even better to make all the parts slightly voluminous. When sewing on a nose or muzzle part, simply place a little filler under it and attach the element to the end.
If you have some experience in needlework or have already practiced on simple samples, you can move on to creating a voluminous souvenir. Below is a cat toy pillow. The pattern in the same picture allows you to create a cute three-dimensional creature for your sofa. If you choose terry or fluffy fabric that imitates wool, you will get a very natural animal.

The pattern for creating such a cute accessory is suitable for any of the ones given above, since these creatures can be of any shape, both in a flat version and in the form of a 3D toy. The most important thing is to make a “facial expression” that matches the emotions.

All parts can be easily made from felt or fleece. You can draw the template yourself or use the muzzle pattern that has already been discussed. To make different "Offended Cats" pillows, the pattern doesn't really matter. The main thing is the arched mouth, and it is usually embroidered, although it can also be cut out of pink material. The details of the muzzle are easy to stitch or even glue, for example, from felt.

You saw how a cat pillow is made. The pattern (any of the options) given in the article will help you create this cute accessory,
Today we will sew such an original and very cute cat. If desired, it can also be used as a pillow. Although it looks much more appropriate as an unusual interior detail.


Sewing this beautiful and original pillow in the shape of a cat yourself is quite simple.
1. First we need to make patterns of all the individual parts of the cat: its head, ears, paws. Then we move on to cutting out the main body of the pillow. The width of the pillow must be such that it can accommodate your head and paws.

2. We cut out the nose according to the pattern, increasing its linear dimensions by about 1–1.5 cm. To fill the nose, we cut out three parts from padding polyester, each should be smaller than the other (the first is slightly smaller than the base of the nose). The parts can be point-to-point connected with glue.
We put fragments of padding polyester into the main part of the nose, sew along the edge and tighten it, giving the desired shape.

3. Making the eyes. We take special cardboard for bags so that we can then wash the main cover. We cut out two circles from cardboard according to the size of the eyes on the pattern. We cut out two circles from white fabric, with a diameter 1–1.5 cm larger than the pattern.
Take black iris threads. Using a large needle, make a French knot. We sew white fabric in a circle. We put cardboard inside and tighten it.

4. Cut out two squares of blue fabric for the head. We glue one square with interlining from the inside out. We transfer the design onto the fabric and mark it with stitches.
We place a sheet of paper underneath to make it easier to advance the fabric. Sew the mustache and mouth in a zigzag along the marked lines. It is better to use thick threads. We bring the threads out with a needle inside out and fasten them, carefully removing excess paper.

5. Sew the nose to the head. First, carefully glue it, and then sew it in a circle.

6. Sew the eyes to the head in the same way.
7. Making ears. Inside the ears you need to put one or two padding pads slightly smaller than the base and stitch them from the bottom.

8. Cut out the head from the square, adding 1.5–2 cm to the seam. Sew on the ears. The main thing here is not to confuse right and left.
Fold the top and bottom parts of the head and sew them together. Leave a piece at the bottom so you can turn it inside out.
Trim off excess fabric. We turn the head inside out, fill it with padding polyester, and sew up the hole.
9. Cut out the paws and tail. We sew the parts together, turn them inside out, and fill them with padding polyester. In the places where the paws are marked, we “mark” them by hand stitching with large stitches with thick thread 2-3 times.

10. Cut out the cat’s body from a rectangular piece of the main fabric, with a zipper provided on the side. We insert the front legs into the front seam and stitch. We insert the tail and two hind legs into the rear transverse seam. We also sew. We manually sew the head to the cat's body.
Separately sew a pillow of cotton fabric of the required size. We fill it with padding polyester. We insert the pillow into the cat's body. That's it, our pillow cat is ready!


This is the kind of charm we got!

Handmade decorative elements always bring comfort, warmth to the interior and reveal the soul of the owner of the house. Sewing a sofa cushion is easy, but many people want to make it unusual. A very interesting topic for needlework is a DIY cat pillow. Patterns and the algorithm for sewing such a product are quite a popular topic among handmade lovers. The simplest and, at the same time, original ideas can be found in this article.
The topic of cats is always relevant. Most people are not indifferent to them. A cat, especially a sleeping one, personifies calmness and tranquility; they not only touch you, but also relieve stress. Therefore, the idea of making a pillow cat seems very successful.
It can be implemented in different ways:
Important! A cat can be embodied not only in a sofa pillow, but also in a sachet pillow with aromatic soothing herbs.
We will not be able to cover all the variations on the theme of cat pillows, so we propose to consider the most interesting, in our opinion. Let's start with something simple.
If you just want to decorate a pillow with an image of a cat, then you can get by with appliqué.
Algorithm of actions:
Important! If the pillow is purely decorative, then the eyes and nose can be sewn on in plastic. Buttons or ready-made eyes designed for soft toys are suitable for this.

DIY cat pillow - it's simple and fun!
If you like to embroider, you can make a pillowcase decorated with embroidery for the finished pillow.
Algorithm of actions:
DIY knitted cat pillows will look especially unusual and beautiful.
Algorithm of actions:
Important! The knitting should be tight.
You can complete the work here, or you can also tie the legs, which will give your pillow more originality.
A sofa cushion is a very convenient thing. It can be placed under your head, under your back, or used as an armrest. If you make it a little flattened and wrapped in the shape of the letter C, then such a pillow can even be used for feeding a baby. The interesting design of such a product will make it not only useful, but also beautiful.
Important! Foam rubber rolled into a roll holds its shape well at first, but its big drawback is that over time it absorbs unpleasant odors and begins to crumble. The best option would be to use more modern fillers, for example, holofiber. It is durable and practical, mites and fungus do not like it. If you want your roller to also be orthopedic, you can fill it with buckwheat or buckwheat husks. In this case, the fabric for the roller should be quite dense.
Important! For a roller in the shape of a cat, it would be interesting to take a striped fabric that is pleasant to the body.
There is another interesting option, how to sew a cat pillow with your own hands, where the head will not hang separately.

Important! In bends, this indentation must be cut almost to the seam, so that after turning it inside out, nothing will be pulled anywhere.
Important! In a similar way, you can sew a curved cushion cushion (like a horseshoe, banana or the letter C). Everything is done in the same way as in the previous case, only from the fabric you cut out not a rectangle, but two parts of the desired curved shape. Then proceed in the same way. These pillows are very popular among pregnant and nursing mothers.
A DIY pillow made in the shape of a cat can be intended for different purposes:
All of them are sewn according to a similar pattern, differing only in size and filling.
Important! If you will embroider the face on a machine or make it in the form of an applique, then it is better to do this before sewing the parts together. If manually, then you can do it after.
Important! The body can be sewn from fabric close to the natural color of the cat, or, on the contrary, you can take a cheerful fabric with a small flower or colored stripe.
By the way, it is not at all necessary to sew a whole cat. You can make a pillow in the shape of a cat's head.

Important! If you fill the pillow with buckwheat, buckwheat husks or juniper shavings, then such beauty will also be an excellent “anti-stress”.
How to make simple cat pillows with your own hands is described in detail in this article. The proposed ideas will be easy to implement even for those people who are not entirely comfortable with a needle and thread. Using the recommendations, you can create an unusual thing. Such a product will not only decorate the interior of the room and help set accents in the design, but will also be a comfortable and practical pillow that can lift your spirits.
Pillows in the shape of cats are very popular in the world. Why not get yourself such a wonderful pillow? Moreover, you can do it yourself. After all, your home with such a pillow will become more comfortable and will improve the mood of its residents and guests. A cat pillow is not at all a useless item; in addition to its direct purpose - a pillow, it will also be an excellent armrest or decorative item. Store-bought pillows have become so banal that now the best thing to surprise others is a DIY cat pillow.
We have prepared interesting patterns, using which you can make amazing pillows. Those who like to lie on the sofa with their pets are not always able to catch them in their place, but in order not to get bored without them at all, a cat pillow will be a temporary substitute for a living friend.
Of course, you can simply print a photo of your younger friend on fabric in a specialized salon, but this is not interesting. The realized idea as in the photo will leave much more impressions.

Moreover, everything that is made with one’s own hands is worthy of greater respect.
You can make a pillow using stencils. It's pretty simple.


The stencils are made independently; you can draw absolutely any cat silhouette. This is done on thick paper. If you don’t want to draw, you can find a picture you like and just print it. Next, it is cut along the contour and transferred to the fabric. Now all that remains is to cut it, sew it and fill it with filler.
Fleece is a very soft and pleasant fabric, it is ideal for various needlework. We will conduct a detailed master class on making a cat pillow from fleece.

To work we need the following components:
Let's make a pattern, the picture shows a pattern with a scale without specific numbers, decide for yourself what size your pillow should be, and calculate its size.

We transfer the finished pattern onto the fabric with a pencil, pen or marker so that we can clearly see the contours. We pin the fabric, folded right sides together, so that it does not move.

Now we sew on a machine or sew by hand directly along the contour, leaving room for the possibility of filling with entrails. When everything is stitched, we cut it out with scissors according to the shape of the parts, but leave a little less than one centimeter allowance.

We prepare a small incision at the site of the mouth. This should be done if you forgot to leave room in the seam for filling the guts. After filling with filler, this incision is sutured.


Having drawn it on a piece of paper, we transfer it all to the fabric and embroider it. Now the finished face is pinned for fitting with needles. And if we’re happy with everything we’ve got, we sew it on.

Add the tail last.

This cute cat pillow will now live in your home or go as a gift to someone to visit.


You can knit not only sweaters, but also beautiful little things, like this cat pillow. It is knitted with regular needles of medium thickness. You can also use any kind of thread. Two similar squares are knitted. The size is chosen at your discretion. After the squares are ready, they are sewn together and filled with soft insides. You can even simplify your task and knit not two squares, but one rectangle, which is then simply folded.
To the finished regular knitted pillow, all that remains is to add paws, a tail and build a muzzle.
The Scops Owl cat is very popular. Well, it’s true, cats spend most of their lives sleeping. This prompted this idea.
| Related articles: | |
|
Haircuts for long hair: creative ideas Creative women's haircuts for long hair
So, it's time to radically change your image. What to do, if... The meaning of a pit bull tattoo in men and women What does a pit bull tattoo mean?
A harmonious and at the same time beautiful tattoo is a real... Is it possible to pierce at home?
Many centuries ago, wild tribes were fond of body punctures. But they did... | |


