Readers' Choice


Popular articles
The ideal option for creating New Year's toys are cones of spruce and pine trees. Their advantage is that they have different shapes, colors, textures, perfectly emphasize the New Year's atmosphere, and look elegant. Therefore, it won’t be difficult to figure out what the future toy will look like.
The whole family can work on creating toys, and this will bring children and parents closer together. An additional advantage would be to use the gifts of nature for decoration - all kinds of twigs, needles, acorns, leaves, etc. From all this you can make a whole collection of New Year's toys.
 Everyone knows that decorating pine cones is a creative and inexpensive process. It does not require any special equipment, and all the material can be found in any park where pine trees grow.
It is best to use fallen cones, because those that are still growing on the trees remain juicy and may not dry out and become moldy. In addition, the collection process is very exciting and useful.
For work we need:
Before you start working, the cones need to be prepared. First, they need to be cleared of debris and soil, washed and dried if necessary (this is done away from heating appliances, in a well-ventilated area). If they turn out to be unripe and have not fully opened, they are placed in a low-heat oven with the door ajar. This is done so that moisture comes out of them and they open completely.
 The blanks can be left as they are, or you can resort to partial or complete coloring. Can also be decorated with decorative elements such as glitter or artificial snow. Everything will depend on your imagination.
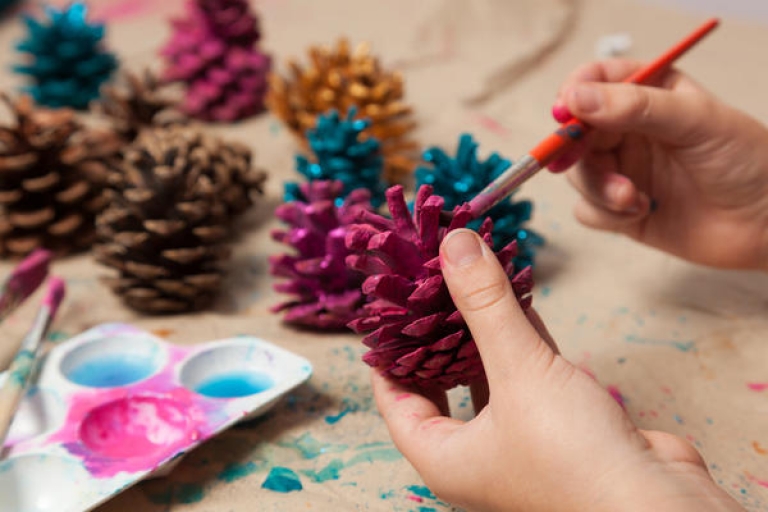
The cones in their natural form are beautiful in themselves, but if you need to make any color accent in the decor, you will have to resort to coloring. Their structure allows them to perfectly absorb and retain paint. You can even paint the pine cones with gouache, but it is short-lived and can soon peel off and get dirty. Therefore, acrylic paints are best suited for decorating a toy.
To make the perfect New Year's toy, you need to have the following components:
With their help you will decorate your cone in a very short time.
Since varnishes and paints have a very specific, pungent odor, work with them must be carried out in very well-ventilated areas or in the open air. It is expected that several coats of application will be required. It must be taken into account that each layer must be dry. Work with painted material continues only if all layers are dry, otherwise the design or coating may be damaged.
So, let's figure out how you can make a simple Christmas tree decoration with your own hands..
The big advantage of this master class is that it can be done by the whole family and it will be an exciting event for all its members. Be sure to involve your children, because creating crafts is a very useful and interesting activity. It develops hand motor skills, improves imagination, and teaches accuracy.
In order to make toys for the Christmas tree from pine cones with our own hands, we will need:
 We paint the cones green and wait for them to dry. Using a thin brush and white paint, we imitate snow along the edges of the cone. Using glue, glue the beads or cover the scales with glitter. We got miniature decorative Christmas trees covered with snow. We make a loop from a piece of wire and glue it to the top of the pine cone. The wire can be wrapped with satin ribbon or rain.
Surely, when you were in the club, everyone saw a large luminous ball that rotates under the ceiling. But you can make a similar ball with your own hands from pine cones for an atmospheric party on New Year’s Eve.
For this we need:
You can, of course, buy a ball blank at a specialized craft store, but you can also make it yourself. We wrap toilet paper soaked in a mixture of water and PVA glue (2 to 1) around an inflated balloon of the required size. We give it a day to dry. Then we paint it brown and wait again until the paint dries. You need to make sure that everything is well painted and the gray color of the paper will not show through between the cones. Avoiding large indents, glue them one at a time.
To make the ball look festive, you can paint it over with sparkles or wrap it in a garland. We hang it from the ceiling or attach it to a chandelier.
 If you wish, you can make absolutely any toy from pine cones, for example, gnomes, which kids really like, especially since it is not at all difficult. A fir cone is used as the body of the gnome, and it is best to leave it in its natural form and not paint it with anything.
In order to make the head of the figurine, use a plastic or foam ball. Using a marker or paints, you can draw his face. The arms and legs are made of wire, which is then covered with fabric. Clothes can be sewn by hand or on a sewing machine, and shoes can be made from leather or thick felt. If you also use your imagination, you can make girl gnomes with funny braids from threads.
Attention, TODAY only!
The decor of pine cones will decorate the interior of the room and the exterior of the house. This simple and affordable material is used to make funny little animals, miniature trees, original bouquets, decorative wreaths for the holidays and entire wall panels. In our country, cones or achenes, as they are also popularly called, are associated with the New Year, decorated Christmas trees and the smell of tangerines. In Western countries, they decorate traditional wreaths for Christmas. They are made from tree branches and decorated with bows, beads, candles and artificial snow. The finished composition is attached to the front door or placed on a festive table. When creating crafts, acorns, chestnuts, walnut shells, fabric and various accessories are additionally used. There are several of the most accessible types of natural material:
Cones are a natural, eco-friendly material, crafts from which you can easily create with your own hands, armed with patience and a couple of master classes.
Fir and pine cones are collected throughout the winter. They ripen and begin to fall off by mid-autumn. “Closed” cones grow on the branches: their “scales” fit tightly to each other, thereby protecting the seeds. Underfoot, like a fallen carpet, there are usually already opened specimens. Owners of country houses and dachas go to the nearest forest to get their loot. Residents of apartments in big cities go to parks. Usually maples, chestnuts and blue spruces are planted there. After the “forest” harvest has been collected, it begins to be processed. This stage is of great importance, since over time the craft may lose its shape, and, accordingly, its “marketable” appearance. A few tricks will help any novice decorator with this:
The latter processing method will additionally disinfect the material.
By the way, when the cones are heat treated, the apartment will be filled with a unique pine aroma that will linger for a long time. This method is used to create a New Year's holiday atmosphere.
Mandatory attributes of New Year's decor are pine or fir trees, garlands, balls and of course tangerines in a basket. From cones you can make not only decorations or bouquets, but also wreaths, toys, decorative candlesticks that will decorate the room and the festive table. Gifts are given in baskets made from seeds or sweets are placed in them for guests.
Christmas decorations made from pine cones look stylish and original. They are usually combined with simple balls. All toys are conventionally divided into several types:
To create a simple decor that will nevertheless look stylish and natural, you will need:
For additional decoration use ribbons, bows, miniature gifts, red beads imitating rowan tassels. Once the buds are properly prepared, they are spray painted. Usually they use paints with a metallic or gold tint, because such decoration looks more impressive. If simple colors are used: red, green, purple, then they are additionally decorated with sparkles on top. After the paint has completely dried, the surface is covered with a layer of glue and, while it is still wet, sprinkled with shiny crumbs on top. In some cases, the tips of the blossoming scales are painted white, imitating snow (sprinkled with salt). A similar coating, but more voluminous, can be made from small pieces of cotton wool. The “root” of the cone is pierced with a needle with a thread threaded through it or a loop is tied on it. In this way, the toys will be attached to the Christmas tree. “Brushes” of beads are strung on a thread, and satin ribbons and bows with tiny gifts are attached. The latter are quite easy to make:
Garlands of cones are created according to a simple scheme:
Christmas tree stars and large snowflakes are created according to the same principle. The only difference is that the second rays will have more. The asterisk traditionally has five ends. To work you will need:
First, a five-pointed frame is made from wire. For snowflakes, add “rays” at your discretion. Then the cones (about the same size) from the side of the “cuttings” are pierced with an awl. The wire is coated with glue and decor is strung on it. After the fastening agent has dried, the finished products are painted and sprinkled with glitter or artificial snow. To create snowflakes, cones are attached to the core with sharp ends to create a “fluffy” shape.
To make decorative animals you will need basic material, toothpicks or wire, glue, beads for eyes, pieces of felt or other fabric for clothing and cotton wool. To create an animal from pine cones, you will have to use your imagination. A large specimen will become the body, a smaller cone will be suitable for the muzzle, and the legs are made of thin wooden sticks. Santa Claus and snowmen are dressed in tiny suits. “Parts of bodies” are connected to each other according to the principle of star fastening (wire and glue). To create individual elements, felt is used, which holds its shape well. Thus, the tree is hung with hedgehogs, squirrels, bear cubs, bullfinches, owls, fawns, mice and gnomes.
An original solution would be to use old small toys that are no longer good for anything. They are “gutted” into separate parts, which are subsequently glued to the cone’s body.
As a basis for the wreath, a ready-made frame, wire or cardboard, bendable twigs, or old newspapers tightly twisted into a ring are used. You can attach decor in several ways:
Wreaths made from achenes are hung on doors, on walls in rooms or placed on a table near the Christmas tree. To decorate them, tiny balls, stars, silk ribbons, beads, plastic figures, dried fruits (orange halves) and coniferous tree branches are used. The cones are painted in different colors, sprinkled with glitter, decorated with snow and “draped” with translucent ribbons.
A ball of achenes will be an original decoration for the New Year's Eve. To create it you will need:
First, the balloon is inflated, then it is carefully wrapped in paper, which is pre-soaked in glue. The composition is left alone until completely dry. Then its surface is painted to prevent the paper from showing through between the slender rows of achenes. A festive ribbon is put on the ball, which will act as a loop for attaching to the ceiling or doorway. Now the most difficult stage of the work: gluing the cones. Since the base is very fragile, it should be handled with the utmost care. The achenes are glued to it in a row, trying to avoid the formation of voids. After drying, the surface of the ball is further decorated.
The frame can also be made from an old wire hanger. Its hangers are connected to each other, and the hook is cut off or used as a basis for the volumetric part of the future wreath.
Not only decorations are made from cones, but also the Christmas trees themselves. For these purposes, you will need either one cone or a dozen specimens of similar size. A miniature Christmas tree is placed in the same pot. The cone is spray-painted green or silver and waits until it dries completely. Then they start decorating. Tiny openwork snowflakes, ball beads, stars made of foil or shiny wrapping paper, and threads of rain are hung on the opened scales. For a large Christmas tree, a cardboard cone is made. Achenes are glued onto it in rows with their sharp ends facing out. Large cones are attached at the bottom, and smaller ones are left at the top. The finished tree is decorated with New Year's paraphernalia. The presence of even a tiny Christmas tree in the workplace will bring with it a feeling of celebration.
You can create candlesticks from scratch yourself or decorate existing ones. The easiest and fastest option: using glass containers. Salt is poured into it to imitate snow and decorated with small twigs. A candle is placed in the center of the composition. The neck of the jar is coated with glue, onto which salt is sprinkled. A pair of decorated cones are secured on top of the “snow” layer with twine or a satin ribbon. For more complex compositions you will need:
The opened cone is carefully disassembled into individual scales. Cut out a small circle from cardboard twice as large as the bottom of the candle cup. The first row of “scales” is glued onto the paper base. Gaps are left between them, since the surface will have a checkerboard pattern. Then the next one is gradually glued onto each row, thus forming a bump. Closer to the top, the scales are directed with their tips inward to repeat the outline of the sample. Then the candlestick is decorated with “snow” or sparkles, and a container with a candle is placed in the center.
On the festive table, not only decorated candlesticks are placed, but also bouquets of seeds, small pine branches near the dishes, or miniature Christmas trees.
Cones are an excellent material for making crafts with your child. They are worthy competitors to clay, plasticine and cardboard. The seeds are often used to create funny little people and animals (turkey poults, spiders, foxes, dogs). The main thing in this process is to use your imagination and see the muzzle, back or paw in the outlines of the cones. The work uses the main material, fabric for decorating costumes, glue, an awl and wire (toothpicks) to connect the parts together. Additionally, twine, feathers, buttons for eyes or noses and twigs are used.
For the bear's body, it is better to take a large fir cone. The animal will “sit” like a person. Pine “legs” are attached to it. To do this, use a wire that is threaded into pre-prepared holes. The animal's muzzle is decorated with black peppercorns or beads, which will replace the button of the nose and eyes. Ears can be made from felt or loops of woolen thread. To create another model, the achene, simulating the body, is wrapped with twine. The paws are first attached to it using a thin wire (it is tied around the “body”). The head is also decorated with twine and attached to the rest of the bear's body using a piece of solid wire, which will act as a frame. The finished animals are dressed in tiny costumes, caps are placed on their heads, and satin bows are tied around their necks. In more complex models of crafts, ears and paws are assembled from “scales” pulled out and re-glued together. To make the toy soft, the “heels” and ears are decorated with pom-poms, pre-assembled from light-colored threads.
Chestnuts make excellent caterpillars, and when paired with cones, they imitate the smooth heads of crafts. These fruits flow organically into the New Year's composition. They are first cleared of the prickly shell. Park “nuts” are easily attached to wire or toothpicks. The result is an improvised “bud” that is woven into wreaths and bouquets. Chestnut and nut filling can decorate a basket of pine cones. They are also used to create large Christmas trees: the surface of the fruit is covered with artificial snow.
Acorn caps are usually used to create legs and arms in crafts that imitate people and animals. You can also make a magnificent voluminous wreath from them. Whole acorns, their empty caps and pine cones are glued onto a thick base of paper or cardboard. The finished wreath is coated with shiny spray or paint and wrapped with twine. Acorns and cones make original topiaries. The tops of such “trees” are not specially painted, since a composition with different shades of brown in itself looks harmonious. Along with walnuts and hazelnuts, acorns are used to make additional decorative elements in winter bouquets of pine cones.
The long-standing Russian tradition of making New Year's toys with your own hands almost died out by the end of the 20th century. Still would! There are so many magnificent balls, stars, animals and fairy-tale characters made in factories in stores! How could simple crafts—or a bronze-painted walnut—compete with them?
Today, fortunately, the tradition is returning, because the point is not what to hang on New Year trees, but to engage in exciting creativity with children, to instill in your sons and daughters the skills of handling scissors, glue, and paints. Among the most popular materials from which Christmas tree decorations can be made are ordinary pine and spruce cones.
Cones are not sold in stores, except in those where you can buy a variety of unexpected materials for creativity. However, this is not particularly necessary. By visiting nature with your children, you can create the necessary supply of cones of any size and shape throughout the year, while at the same time collecting other natural materials that will be useful for your New Year’s workshop: acorns with “caps”, beautifully curved twigs, moss, maple and ash seeds, hazelnuts.
The cones are closed, dense or with “ruffled” scales. In order to make New Year's crafts, you will need both, depending on what you plan to make. However, it can be a shame if the toy begins to open up under the influence of home heat - and your finished crafts become deformed.

To prevent this from happening, the cones must be pre-treated:
Heat treatment, by the way, will destroy microbes on the cones and make the natural material safe, which is very important when it comes to children's creativity.

In addition to the cones, you will need:

Depending on what toys you are going to make and using what technologies, this list may expand. For example, you may need plasticine and papier-mâché, nail polish and wire in beautiful plastic insulation.
Cones are a very beautiful natural material. To decorate a Christmas tree with them, sometimes it is enough to simply paint each one in any color (red, yellow, purple) and add glitter. According to the experience of those who have been making crafts from cones for a long time and conduct a master class on the Internet, it is better to use enamel for painting cones rather than acrylic paints, which do not lie smoothly enough.

It is convenient to use multi-colored Christmas tree tinsel as glitter, the so-called rain, which must be cut very finely with scissors. The cones are dipped for a couple of seconds into a container of varnish used for woodworking, and then sprinkled with shiny multi-colored pieces of tinsel.
The New Year's toy is almost ready. All that remains is to make a loop so that it can be hung on the tree. For this purpose, self-tapping screws with a ring are used.

Now try to take on more difficult work. Make Santa Claus out of pine cones.
Your Santa Claus is ready. Now, using the same technology, you can make his constant companion - the Snow Maiden.
A separate master class includes making toys using plasticine. This material, however, has one drawback - its fragility, it can become deformed due to too high a temperature in the room or if the craft is carelessly picked up or dropped.
And the advantage of plasticine is that children who have already acquired skills in handling this material can be actively involved in this work.

Try making a hedgehog. The cone will make a body, and plasticine (lighter in color than the cone) will make a muzzle. You will also need to make paws, a traditional apple or a mushroom, which are placed on the hedgehog’s back. Using the same technique (using plasticine) you can make a swan, owl, penguin, squirrel, crocodile, hare - all those that your child wants to make.
An original effect is achieved by bleaching the cones: to achieve this, the cones are kept in ordinary bleach, used for washing and cleaning, for five hours. The ratio of the drug and water is 1:1.

You can get the illusion of a frosty day by covering the cone with silver (not multi-colored) sparkles: coat the cone with glue, roll in the sparkles, dry so that they have time to “grab” with the glue, and then brush off the excess.
Very cute toys, which, by the way, will look very professional, can be made using old broken and unnecessary plastic dolls and various animals. Taking a pine cone as a basis, you can glue a doll’s head, palms, and legs to it. In this way you can make Santa Claus, Snow Maiden, hedgehog, deer, dog, kitten, mouse, and various birds.

You don't have to hang all your crafts on the tree. To make your room truly New Year's, toys can be hung, for example, from a chandelier. By the way, this way you will be able to examine the toy in all its glory, from absolutely all angles.
Good afternoon, today I want to show you what interesting crafts you can make from pine cones for the New Year. Cones are free natural material that can be used to create original Christmas tree decorations. You can decorate the New Year's table setting with cones. New Year's pine cones painted with paints can become part of the festive composition in home decor for the New Year. Many crafts are suitable for children. And also ideas for adult design made from pine cones. Let's see what New Year's crafts you can create with your own hands using cones (pine and spruce).
For those who know how to knit (crochet or knit) or sew from felt, it will not be difficult to create such winter men on skis or on a sled. We make the body of the men from an open pine cone. The head is made from a ping pong ball or a small foam ball, tinted in beige gouache. We make skis from ice cream sticks, ski poles from simple toothpicks, and handles from fluffy wire. Children's New Year's creativity made from natural materials is a good idea for practicing at home or during labor and arts lessons at school.

Using the same principle, you can put snowmen or penguins on skis. The snowman's head can be made of a white fur pompom (as in the photo of the New Year's craft below). Or you can make a head out of a foam ball or cotton wool (mix cotton wool with PVA glue and roll it into a round ball, dry it and use it as the head of a craft snowman made from a cone.

But the author’s penguins are small (made from a pine cone) and large (made from a long spruce cone). The penguin's head is made of a white foam ball, which is painted with black gouache. Headphones made of wire wrapped in wool thread and two small fur pom-poms. Black penguin wings-legs are cut out of felt or formiam.

You can make a whole flock of penguins wearing red New Year's caps from pine cones. Penguin wings can be made from black plasticine or pieces of tree bark (as in the photo below). Children will love this DIY craft.

And if we glue big round eyes and a hook nose to a round pine cone, we get an OWL. We make wings from felt, or formiam, or from a piece of leather (leatherette). Owl caps can be glued together from bright paper napkins with a New Year's pattern (this is how our owls made from cones will look festive).

If you buy pieces of felt (it is sold in sheets, like paper, and you can buy small sheets of different colors) - then you can create a whole series of funny New Year's animals based on the pine cone.


And here’s another idea for the New Year, where pendants are made from pine cones to decorate the New Year tree. Here everything is done according to the principle – at the bottom is a bump, at the top is the character’s head. Big-headed cones - DIY crafts available for activities with children.

The simplest thing is to take a foam ball and stick buttons on it for the nose and eyes. The nose can be cut from a thick piece of orange felt. Or the nose can be sculpted from cotton wool soaked in PVA glue; when it hardens, such PVA wool becomes as hard as wood (a convenient material for crafts, especially since any color of gouache can be mixed into the PVA glue and we get not only a durable part, but also what we need for you colors).

With the help of felt or fluffy wire, wings can appear on the pine cone, and then such a craft can be decorated as an angel or fairy.

If you paint a cone with gouache red, you will get the basis for a Santa Claus craft. It is better not to paint the bump with a brush. And immediately dipping the whole thing into a plastic cup of paint. Pour PVA glue into a glass and add red gouache. We dip the entire cone into this coloring mess.
Important! Save your money. Do not buy PVA in small tubes from office supplies. Go to the construction department of the store and buy PVA in a liter bucket (the price will be 4-7 times cheaper).


Crafts made from pine cones look very nice with added red elements - ribbons, beads, felt. These are great ideas for New Year's children's crafts made from pine cones - simple, quick and easy for a child.

You can also make CHRISTMAS crafts from pine cones and other natural and available materials. Lush ribbons and lace patterns can be used as wings for angels. You can crochet openwork angel wings with your own hands if you have ever knitted napkins. You can use pine cones and pieces of felt (or fleece) to make a whole Christmas scene with a newborn baby Jesus in a cradle.

And here are samples of crafts with pine cones decorated for the New Year. As decoration we use sprigs of pine needles from a Christmas tree, green leaves from indoor plants, or torn from a bouquet, small alder cones, pieces of moss, beads, balls, bells, bright ribbons and shiny paper.

Decorated pine cones that have been pre-painted (dipped in a glass of colored PVA glue) look very beautiful and festive. After painting and drying, the cone should be sprayed with hairspray - the color will become brighter and the cone will begin to shine like a glossy one. And you can quickly sprinkle glitter on a bump wet from polish (nail polish is suitable).

You can buy small bird figurines at a craft store. They will look great on top of your New Year's pine cone. Birds can make nests from Christmas tree needles and decorate them with red beads.

You can also decorate the cones themselves with beads from beads, or small pom-pom balls, inserting them between the scales and fixing them with hot glue.

And you can also put the cones together - into a snowflake star. We lay out six snowflakes on the table - butts together - tips apart. And glue them together with hot thermal glue from a gun. Cover the gluing area with a snowflake cut out of cardboard, spruce paws, beads or a small cone (the tip cut off from a large cone).

Here's an interesting way to make crafts from pine cones for the New Year. If you take it and pull out the scales from the cone. From them you can (like from natural puzzles) assemble any pattern or three-dimensional shape.

For example, cut out a star from cardboard. And we lay out the scales on the glue along the contour of this star, gradually, row by row, getting closer to the middle. This craft will appeal to school-age children - you just need to pull out the scales in advance.

You can simply lay out a flower made from cone scales on a round piece of cardboard. You also need to start from the EDGES of the cardboard circle, and row by row reach the middle of the flower. Glue fabric lace or a paper snowflake to the back side of the flower. We get an elegant openwork craft for the New Year.

You can also decorate a paper cone with scales from the pine cone. This way we will get a Christmas tree craft made from natural cone material (as in the photo below).

Here's another interesting New Year's craft. Take milk cartons (small size). We paint them in white gouache and draw black stripes on top (we imitate the color of birch bark). We cut a round hole in one of the sides of the box. And we glue the top of the milk box (it is shaped like a house-roof) with cone scales using hot thermal glue from a gun. And we get this (photo below) New Year’s craft in the form of bird houses. Very beautiful and unusual.

You can also cover the snowman’s foam belly with scales - put a fur coat of cones on him. A beautiful craft for older children.

Very interesting decorative panels can be made from pine cones. If you make any shape from slats (for example, a star), then you can paste it over with pine cones - and you will get an original New Year’s craft that can be hung on the wall, leaned against the wall next to the tree. You can wrap this pine cone star in a garland and illuminate it with light bulbs.

Armed with a glue gun, you can assemble an openwork snowflake craft from pine cones. And also use it as a wall panel.

And if you have a small number of cones, you can make a wall panel from another natural material, and use the cones as an additional decoration.


Christmas wreaths can also be made from pine cones. To do this, they can be painted in any color (dipped in glue-pva, tinted with gouache, or covered with spray paint).
We make a wreath based on a wooden or cardboard ring. We attach the cones to the base ring using glue.


Also, cones can become part of a New Year's composition decorating your festive table for the New Year. You can simply place the painted cones on the table between dishes and glasses. Or you can hang it from a chandelier using bright ribbons or hang it on the edge of a table (as in the photo below).
You can also make a serving boutonniere from the cones to decorate each guest’s plate.

It looks beautiful if you match the color of the pine cone with the same color of shiny sprinkles. Make the cones sparkle and sparkle like frosty patterns on a winter window.

You yourself can come up with various compositions with cones and other materials. Your imagination and interesting “unnecessary things” found in your desk drawer can become a source of original exclusive DIY crafts made from pine cones.

In the same way, you can include candles in your tabletop New Year's composition of pine cones. You can simply place candles in a beautiful dish and arrange pine cones around them, painted in shades close to the color of the candles.

If you are making a craft where all the cones are glued together, then when assembling such a glue cone pile, insert pieces of plastic tubes inside - you can insert candles into these places. When gluing, make sure that the candle stand tubes are glued strictly vertically - otherwise your candles will not stand in straight columns, but at random.

It could be easier. Place a glass on a cardboard circle. And around it on cardboard with glue attach pine cones, pine branches, berries, stars cut from birch bark and orange peel.

That is, any decorative method is suitable for creating a candlestick. Or we place a candle inside a ring made of pine cones and natural material. Or we glue (tie with a ribbon) the natural material to the body of the candle itself. Or we put a candle inside a tall glass and around it we insert pine cones and other tinsel directly into the glass (as in the third photo below).


And also your New Year's compositions from pine cones can be decorated as tall PYRAMID TREES. Such Christmas trees can be made from ordinary cones, or from spray-painted gold ones. And you can decorate them with ribbons, felt flowers, small Christmas balls (also glue them with thermal glue).


These are the ideas I have for the New Year 2018. Let these works inspire you. And let your cones blossom with craft ideas in your skillful hands.
Happy New Year's creativity.
Olga Klishevskaya, especially for the site ""
If you like our site, you can support the enthusiasm of those who work for you.
Happy New Year to the author of this article, Olga Klishevskaya.
As I promised in the article about wreaths, I’m telling you how to paint pine cones for the New Year. I'm sure you'll love it! And also, this is a way to keep your kids busy with “socially useful work,” that is, to use their energy for a good cause!
There are working rules:
It remains to figure out what and how to paint it.
How can you color the pine cones?
There are many tools and methods that are suitable for this purpose:


Will need:
Making an original decoration step by step:


A couple of tips:
But there are other decorating ideas.
Interestingly, escapes are possible not only with the help of paints. There are other means:

Yes, and you shouldn’t forget about color combinations, so that your composition of pine cones does not look like a cheap handicraft. I don’t know my way around the color wheel myself, but I refer to the useful sign below as a guide:

Well, a few combinations of the cones themselves. 
I think that with the decor that we prepared today, the holiday will become especially beautiful and elegant! Did you like the ideas? Share them with your friends and subscribe to other articles.
| Related articles: | |
|
Cream with spf: why is it needed?
The hot days have finally arrived, which means it's time to switch to summer... Age difference between man and woman
Traditionally, the purpose of relationships between representatives of different sexes is... How to stop breastfeeding?
Usually a child is ready to wean when he... | |


