Extraction of gold from stone requires a completed technological process...


The harm and benefits of panty liners
Hello, friends! I continue the theme of finishing knitted items. And this time we will talk about cords. In some cases, it is quite appropriate to use them for finishing. There are several simple ways to tie a cord with your own hands. Let's look at them.
1. Knitting a cord with knitting needles
The cord can be knitted. The cord knitted in this way turns out to be beautiful and voluminous; it is not much different from the usual cylindrical factory cord. And it is very easy to knit on two knitting needles.
We put 3 loops on the knitting needles and knit like this:
1st row: remove the first loop unknitted (thread before work), knit 1, purl 1;
2nd row: We remove the first loop unknitted (thread at work), we also remove the second loop unknitted, but the thread is already before work, we knit the third loop under the front wall.
You can crochet a cord much faster. To do this, you just need to knit a regular chain of chain stitches. But in order for the cord to look beautiful and neat, we knit the chain tightly, with very even loops from threads folded several times. In this case, the cord turns out, however, thinner and less voluminous than when knitting.

The cord can simply be twisted by hand. To do this, take several threads folded together, approximately two and a half times the length of the future cord. We twist one end of the folded threads in one direction, the other in the other.
Continue twisting until the threads are twisted. Then we connect both ends, and we get a twisted cord. We secure the connected ends with a knot.
You can do it differently. We fold the threads in several folds of the required length in half, fasten them on the bend (you can tie them to something) and twist each end in one direction: one end with the left hand, the other end with the right hand. After connecting the twisted ends we get a twisted cord:

At the ends of the cord you can attach pompoms, tassels, large wooden or plastic beads - it all depends on your taste, imagination and design of the model.
Go ahead, dear knitters, and make your items uniquely beautiful. The author of the blog, Arinika, was with you. See you again!
Some knitted items, such as booties, require laces.
Laces can be knitted very easily on knitting needles; it is best to do this on double needles: to do this, you cast on 2 to 5 loops on a knitting needle, depending on the thickness of the lace, and knit them with knit stitches - all the loops are knitted, including the edge ones. Having finished the row, you do not turn the knitting over, but simply take the knitting needle from your right hand to your left, move the knitting to the right end, pull the thread through the knitting and begin knitting the row again with knit stitches. Due to the stretched thread, the lace is obtained in the form of a hollow cylinder. Knit as many rows as the length of lace you need.  Another way is to twist the lace from two threads. To do this, take threads approximately 2 times longer than the length of the lace, fold them in half and fasten them, for example, on a driven nail so that the two free ends are in your hands and the thread is taut, and begin to twist each thread with both hands at the same time. clockwise. Then we connect both ends together, twist them together a couple of times, and then they twist themselves into a bundle. In order for the rope to be sufficiently elastic, each individual thread must be well twisted. To prevent the tourniquet from unwinding, we make tassels at the ends or tie knots.
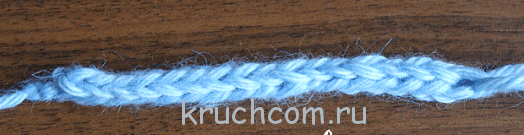
 And finally, the easiest way is to simply take a few threads and weave a braid - you can make tassels at the ends of the braid.
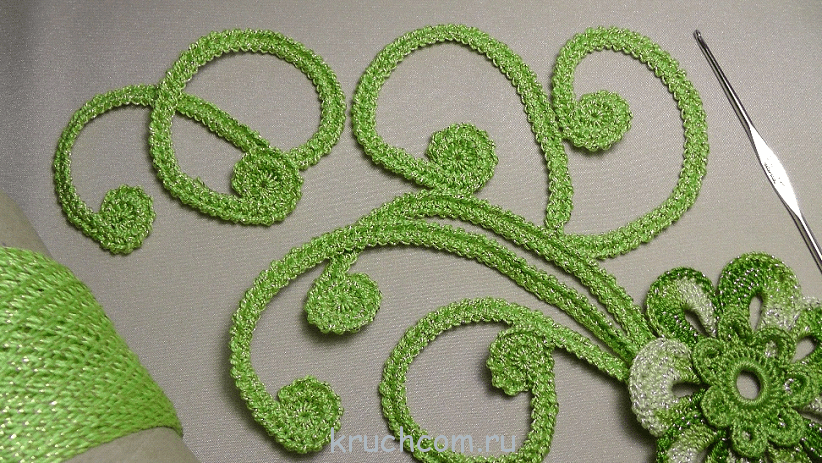
The caterpillar cord is very popular. This cord is most often used as a belt, strap or string for a mobile phone. It can be used as a hair decoration. Some curtains use laces to make them unique and easy to use. “Caterpillar” can be an excellent basis for beads or necklaces. Making an interesting and bright Caterpillar cord step by step using a hook is quite simple and even a beginner can knit it.
When knitting any product, if you are a beginner, be sure to use the pattern of the product. It greatly simplifies and facilitates the work. The cord diagram is shown in the photo below.

First we need to throw on three air loops. Now turn the knitting away from you 180 degrees. Place the hook under the bow of the first loop. Having captured the thread, we should get two threads. We hook the thread again and pull it through a couple of loops on the hook. Turn it 180 degrees again.
By inserting the hook under the resulting bow, we must grab the thread. We get two loops, through each of them we pull the captured thread. We turn away from ourselves again, we get two arms. Insert the hook under the arms and grab the threads twice. Pull the thread through both loops. We unscrew it again, insert it, grab the thread with a hook and pull it through.
We repeat the sequence of actions until you get the cord of the length you need.

Using a hook you can get not only a thin cord, but also a wide one. This cord looks more like a ribbon. It is knitted almost the same as the previous cord, but there are still minor differences in the knitting pattern.
We cast on three air loops, grab the thread with a hook and pull it through the second loop. Insert the hook into the first loop and pull another loop onto it. Crochet all three loops.
Rotate the product 180 degrees. By introducing the hook from above, we can knit the last loop in two half-loops. Take the hook and put on the second loop.
We hook two half-loops from the side of the lace, grab the thread and throw the third loop onto the hook. We knit three loops again and don’t forget to take the thread.
Rotate 180 degrees. We hook a couple of half loops on top and pull another loop onto the hook. We knit three loops.
We knit until you get the desired result.
We hope that our master class was useful for you; if you do not understand something, we recommend that you watch the following videos.
Knitting a cord is a necessary step in learning crocheting needlework, because the cord is an important part of many knitted items. Cords are used both as a functional part of clothing or accessories, and as decorative elements for finishing a product.
Crocheting a simple cord is a simple process, understandable and accessible even to those who have just started learning to knit. At the same time, there are a huge number of methods and techniques for knitting cords, and not all of them can be called easy.
The most famous, simplest hook cords include:
If you can handle simple cords with your eyes closed, then it is advisable to practice well with their more complex versions. That is why today we invite needlewomen to enter the world of crocheted cords - from the well-known “stupid” i-cord and “caterpillar” cords, to exclusive ones – cords made of hearts and spikelet cords.
I-cord is recognized as one of the relatively easy ways to crochet a bulky cord that completely imitates knitting. It got its ridiculous name from the English phrase “idiot cord”, i.e. “stupid cord”, which involves simple knitting, understandable to absolutely everyone. The cord itself turns out to be wonderful, triangular, completely identical on each side. Its distinctive feature is elasticity; thanks to a special knitting method, it is able to stretch well.
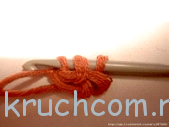
We collect the flail. for 3 VP.
We start with the 2nd pet. chain, we pull the captured thread through it. We get 2 pets.
We move the hook into the trail. p. chain, again pull the captured thread through this loop, we get 3 loops.
Slip 2 stitches. from the hook, hold them tightly with your finger. We knit each of them in turn: 1st, then 2nd, then 3rd. There should be 3 stitches on the hook again. Again, you need to remove 2 stitches, pinch with your finger so as not to unravel. We knit each of the three stitches again and repeat all these steps until the cord reaches the desired length.
Using i-cord, you can not only make cords for clothes and accessories (hats, handbags), but also create decorative elements.
The caterpillar cord is one of the favorites among needlewomen. It is often used in knitting Irish typesetting fabric, as well as Romanian lace lace. Using the “caterpillar” you can make belts, straps, strings for handbags or mobile phone cases. Moreover, such a cord can become the basis for creating exclusive hair decorations, as well as hand-made jewelry.

The cord boasts a beautiful textured surface with neat rounded edges. It is quite dense, so it practically cannot be stretched, does not get knocked down or stretch during use.

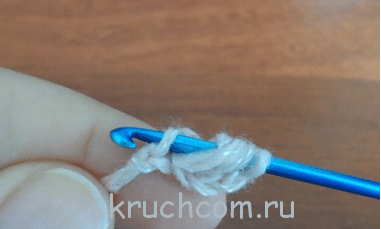
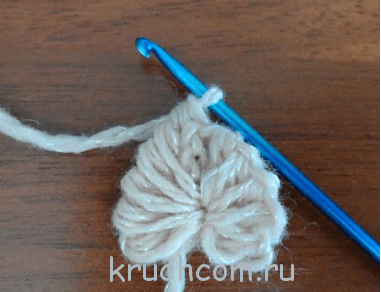
Flail for 2 VP.

In the 2nd from the hook VP - st. b/n.

The two half-loops remaining from the initial chain must be hooked (shown in the photo):

We get 3 pets. on hook:

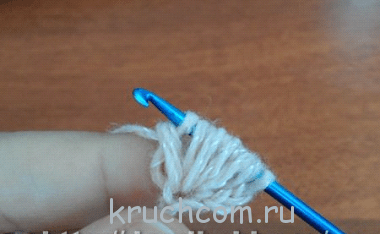
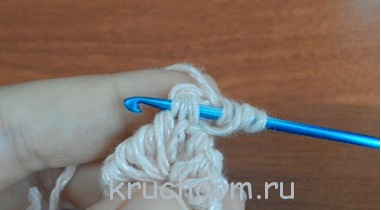
Rotate knitting 180 degrees:
We knit st. b/n on three loops on the hook. We knit two half-loops that “rose” from the base chain as one - with a single stitch:

The two threads marked with black stripes in the photo above must be crocheted:

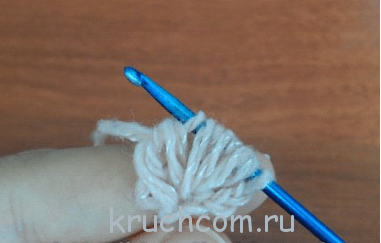
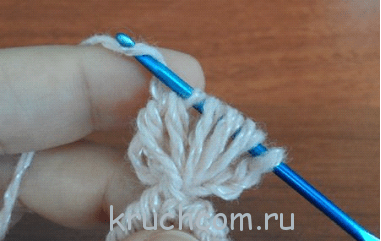
Turn knitting 180 degrees:

We knit st. b/n, in the first two loops on the hook - 1 tbsp. b/n.

The following are marked in the photo above. 2 threads, from which you need to “raise” 2 loops and knit a trace. Art. b/n. You need to hook them, turn the knitting over, knit st. b/n. In this way, knit to the desired length of the cord:

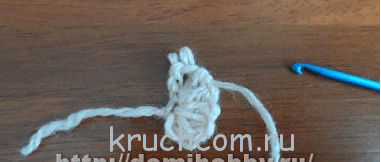
We emphasize that the result is clearly visible only when knitting 15-25 stitches. b/n, a smaller number of connected columns can resemble real gobbledygook. Don’t despair, just give the “caterpillar” a little more time, and knit 25 sts. b/n will definitely do their job!
For those who find it more convenient to learn from video lessons, we suggest watching several detailed master classes on knitting a caterpillar cord:

Double braided cord is often used as a trim on garments, as well as as an independent element of irregular knitting in the freeform style.
First you need to tie a regular braided cord. We start with the chains. from 2 VP.
We pass the hook through the first VP, grab the RN, we get 2 stitches. on hook.
Once again we grab the RN, stretch it through 2 stitches. on the hook, knit 1 ch.
We find the bow from the first VP at the beginning of the chain. and insert a hook into it, grab the RN, pull it through the bow, again we get 2 stitches. on hook.
We stretch the RN through 2 stitches, knit 1 VP.
We thread the hook into the 2nd stitch. previous a couple of loops, stretch the RN.
We pull the RN through both loops. We knit 1 VP.
We knit according to this principle until the cord reaches the desired length.
Then we knit 3 runways, thread the hook into the loop of the stitches, and knit 1 st.
Behind the half-column - 1 more VP, we thread the hook into the bow of the trail. pet., knit 1 PS again. We repeat this until the end of the cord. The double braided cord is ready!
To more clearly examine the process of knitting this type of cord, we suggest watching a video tutorial on this topic:

We knit 4 VP.
In the first VP chain. – knit 1 tbsp. s/n., from its top - perform 3 VP.
We knit 6 tbsp under the VP arch. s/n (optional - you can knit from 5 to 8 stitches).
3 runway, fix st. b/n in the arch, turn the work 180 degrees.
3 runways, under the arch we knit 6 tbsp. s/n.
We perform 3 VP, fasten the arch from 3 VP art. b/n in last pet. ETC.
We knit the cord in the same way until it reaches the desired length.

Such a cord with cones must be knitted with unfinished s/n stitches, thanks to which the finished work turns out to be embossed, as if made using lush stitches. The only, but very important difference from knitting lush columns is that you need to knit not in a horizontal, but in a vertical direction.
We collect the flail. for 3 VP.
Yarn over the hook and insert it into the first stitch. flail We grab the RN and knit a yarn over. On the hook - 2 loops.
Repeat point 2 4 more times. There are 6 loops on the hook that need to be knitted together. The first bump is connected.
We knit 4 VPs, repeat steps 2-3 the required number of times until the cord reaches the required length.
Beginners will be able to quickly learn how to knit a cone cord using the following video tutorials:

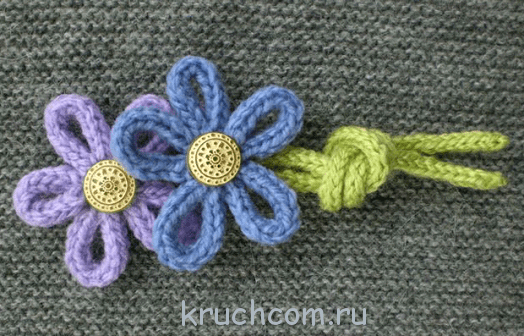
A cord made from alternately knitted lush hearts turns out to be incredibly voluminous, so it is often used to decorate knitted items of clothing, as well as as an independent part of handbags, phone cases, etc.
This cord is not easy to make, so we suggest that you familiarize yourself with a detailed master class with photos and descriptions of each step.
We collect the flail. on 4 VP, on the hook - yarn over RN, insert it into the first st. chain, grab the RN and pull out a long loop. up to the 4th loop of the base chain.


Yarn over again and insert it into the first stitch. and stretch out the RN, forming a pet. the same length as the previous one. We repeat this only 4 times.


In total, we made 5 yarn overs and pulled out 5 long loops, which formed a lush bundle of yarn on the hook. Track. step - gradual knitting of elongated loops and yarn overs.
We grab the RN with a hook and pull it through the 2nd last. pet. (5th loop + yarn over).

We grab the RN again and knit a trace. 2 long stitches – in this way we repeat 3 more rapports. There should be 2 regular loops left on the hook.


So, we have half a heart. Turn the knitting over. Remove the hook and, after turning, thread it back through 2 loops.
We move on to knitting the second half of the heart; for this we need to draw out new long loops. Repeat the following 5 times. knitted combination: yarn over the hook, enter the first chain stitch, pull the RN into a long stitch. to the top of the knitting.


Then we knit long loops and yarn overs in pairs. Afterbirth. 3 loops - knit together. The first lush heart of the chain is ready!


In order to move on to knitting the second heart, we cast on 3 VP from the top of the previous one. We pull out long loops according to the principle described above, but the hook must be inserted not into the VP, but into a loop that combines 3 loops of the previous heart knitted together. Then we combine in pairs (long loop + yarn over).


There are 2 loops on the hook, remove the hook, turn the work, thread the tool back through the loops. We continue knitting, forming the second half of the heart in the same way.


How to tie a lace
Crochet is probably the easiest way to knit cords. But even with all the simplicity of knitting, there are several options for crochet cords.
1) The simplest one is to knit a simple chain of air loops. Such cords work especially well from thick yarn or yarn in several plies.
2) The second, a little more interesting, is to knit a chain and knit a series of connecting posts along it.
3) The third is to tie a chain and knit a series of double crochets (this is not even a cord, but rather a ribbon).
4) The fourth, already full-fledged lace - take several threads (from several balls, for example), from 3 or more, tie all ends with a knot.
Tie an air loop from one thread and pull a second thread through it, then a third, and so on. Actually, in essence, the entire cord is knitted with air loops, but it will differ in appearance from the cord knitted with knitting needles. The knitting cord is knitted, and the hook cord is similar to a store cord, like a shoe cord.
The method is very convenient, besides, you can make multi-colored cords, for this you need to take yarn of different colors, it turns out very beautiful.
3-5-7 loops are cast on depending on the thickness of the yarn and 1 row is knitted on them (without any edge stitches). Then the loops from the right knitting needle are transferred to the left, without turning them inside out. Next we knit the 2nd row, transfer the loops again, and knit the next one and so on.
Of course, it is most convenient to knit such cords on short double needles; there is no need to transfer loops from one to another - they simply move to the other end of the needle.
Another very interesting method is on a reel.
On one side of the coil, 4 nails are driven in at the same distance from the center.
Carnations should be without caps, 0.5-0.7 mm high. The end of the thread is lowered into the hole of the spool and pulled out from below.
The thread from the ball is drawn around the nails (from left to right) so that a loop lies on the spool.
A second thread is drawn around the top of the first nail, the first thread is picked up with a hook and thrown over the nail (Fig. a).
There was a thread-loop left on the carnation, which was used to circle it a second time. Hook up the bottom thread near the next nail (Fig. b).
This is done on each nail in turn. Each time you remove the loop from the nail, pull up the end of the thread from the bottom of the spool.
So, moving the thread in a circle from one nail to another, they knit a cord that comes out from the bottom of the spool. Having tied the cord of the required length, the loops are removed from the nails and secured together with a needle.

Well, and finally - a method for the laziest.
All you need is this machine for tying shoelaces:

Twist your pen to your heart's content!
How to knit a lace using knitting needles

I bring to your attention several ways of knitting such cords.
1. Cord with two loops
This cord can be knitted in 2 ways. First way. We cast on 2 loops, remove the first loop in the usual way, that is, with a pigtail along the edge, and knit the second loop. We turn the work and repeat this row again. We knit this way until the cord reaches the desired length. Second way. Cast on 2 loops. Knit them, then transfer the stitches to the left needle, leaving the working thread behind. Please note that this method does not rotate the work. Knit the stitches again and slip them again onto the left needle.
2. Round cord with 3 loops
To knit this cord you need 2 double needles, both ends of which are working. Cast on 3 stitches, knit them, then move the knitted stitches to the other end of the knitting needle and knit them again. st., passing the working thread from behind. Please note that with this type of knitting the work does not actually turn over.
3. Round cord with 4 loops
Cast on 4 stitches. on stocking needles and knit this cord in the same way as the cord on 3 loops.
4. Flat cord on 3 loops with a looped edge
Cast on 3 stitches, slip the first stitch, purl the other 2 stitches. Turn the work and slip the first stitch again and 2 stitches. Knit purl.
5. Cord with 2 loops of knots
Cast on 2 stitches. Knit 2 knits. pet. Turn the work around. First pet. Remove so that a knot forms around the edge. To do this, remove the loop in the usual way, without straightening the thread, but simply transferring it to work. Knit the second loop. Repeat this row until the cord is the desired length.
6. Flat cord with 3 loops and knotted edges.
Cast on 3 stitches. Knit their faces. pet. Turn the work around. Remove the first stitch. with the formation of a nodule. Next 2 sts. knit the faces. Turn the work again and slip the first stitch. with a knot, knit 2 knits. pet. Repeat this row until the cord is the desired length.
7. Convex cord on 3 loops with knotted edges.
This cord is knitted in 2 rows. Cast on 3 stitches. Row 1: slip the first stitch with a knot, then knit 2. pet. Row 2: first st. remove with a knot, then knit 1 purl. pet. and 1 persons. pet. Repeat these 2 rows.
8. Cord with a thickened edge on 5 loops
The cord is knitted on 2 rows. Cast on 5 stitches. 1st row: 1 st. remove with a knot, 2 stitches. knit knit together, yarn over, 1 st. remove, leaving the working thread behind, finish row 1 purl. 2nd row: 1 st. remove without knot, purl 1. pet., 3 persons. Repeat these 2 rows until the cord reaches the length you want.
9. Complex cord
Cast on 2 stitches. Before starting the row, bring a free knitting needle under the working thread on your finger and, holding this thread, move it to the front side, as when knitting a purl loop. Slip the first stitch and knit the last stitch. facial. You will get 3 stitches on the knitting needle, one of which is formed before starting to knit the row. Then, using your left needle, cross the second stitch over the one you just knitted. You will again have 2 loops on your needle. Turn the work and repeat knitting the row.
10. Flat openwork cord with knotted edges
Cast on 3 stitches. 1st row: 1 st. slip with a knot, 2 yarn overs, 2 stitches. together persons 2nd row: 1 st. remove with knot, purl 1. from the yarn over, lower the second yarn over, knit 1. pet. Repeat these 2 rows until the desired length of cord.
Another way.
This method can be used to make flat and voluminous cords from all types of yarn.

On one knitting needle from a set of double needles, cast on from 3 to 10 loops, *move the loops to the end of the knitting needle (without turning!), pull the thread behind the loops and knit all the loops, repeat from *.

After several rows, stretch the cord lengthwise to better distribute the stitches.
Homemade laces or how to make your own lace
Whether you need a cord for a bag, strings for a hat, or string for a bag, you have many options for making it.
Twisted cord
Calculate how long your lace should be. Add another third to this length, and then cut a piece of yarn four times longer. Fold a piece of yarn in half and make a knot on each side. Ask a friend to hold the folded end or hang the end from a doorknob. Twist the yarn until the cord is very tightly woven, always trying to stretch it. Pinch the yarn in the middle, then fold it in half, trying to keep the cord stretched the whole time. (If you want to make a long cord, you will need a helper.) Slowly release a few centimeters from the folded edge of the cord so that the cord unwinds itself. As a result, you will get a strong cord of four threads (Fig. 1). 
Braided cord
Calculate how long your lace should be, then add half more to that length. You will need at least three pieces of yarn this length. If you want to make a thick cord, you can double or even triple the number of threads. Tie the threads in a knot at one end, hang the knot on a hook, attach it to a board, or staple it. Start weaving a braid of three threads, alternately placing the right thread on the center one, then the left one on the center one, and so on. Once you have finished the braid, tie the other end in a knot.
Cord tape
Take two double needles and cast on three or four stitches.

*Knit them with knit stitches. Slide the stitches back to the other end of the needle without turning the work over. Pull the yarn tightly.

Repeat from * until you have tied the length of cord you need. This cord is similar to those cords that are knitted on special devices. On stocking needles the cord is knitted faster.

You can buy a special device for knitting such cords, and with one turn of the handle you will quickly tie it. Examples of such devices:


Cord in the starting and ending rows
Cast on as many stitches as needed for the cord, then cast off all stitches on the next row. Do not tighten the loops too tightly, otherwise the cord will turn into a spiral.
Cord woven on fingers

For this cord, take two skeins of yarn of different colors.
1. Make a slip knot at the end of one strand and place the loop around one index finger. Take the second thread in the same hand and hold it together with the first. Insert your other index finger into the loop and pull a new loop of the second color (Figure 2).

2. Remove the first color thread from your index finger, transfer the ends of the thread to your other hand and pull the working end of the first color thread to tighten the loop (Figure 3). Continue to pull the contrasting color loop through the loop on your finger and tighten the old yarn until you have weaved cord of the length you need. Cut both threads, then pull one end through the last loop of a different color and tighten (Figure 4).

Lace tied on a spool

On the end side of the coil, 4 nails are driven in at the same distance from the center (Fig. 5). Carnations should be without caps, 0.5-0.7 mm high. The end of the thread is passed through the hole in the spool and pulled out from below (Fig. 6). The thread from the ball is drawn around the nails (from left to right) so that a loop lies on the spool (Fig. 6, spool on the right). A second thread is drawn around the top of the first nail, the first thread is picked up with a hook and thrown over the nail. There was a thread-loop left on the carnation, which was used to circle it a second time. Hook up the bottom thread near the next stud. This is done alternately on each stud.


| Each time, removing the loop from the nail, pull up the end of the thread from the bottom of the spool (Fig. 7). So, moving the thread in a circle from one nail to another, they knit a cord that comes out from the bottom of the spool. Having tied the cord of the required length, the loops are removed from the nails and secured together with a needle. | |
|
Related articles:
Crochet ponchos, capes, capes for girls Crochet for children ponchos for girls On a cool autumn evening you just want a little warmth and comfort. Today...
How to quickly and easily knit a hollow cord with knitting needles. The procedure for knitting a heart cord Hello, friends! I continue the theme of finishing knitted items. And this...
Features of searching for placers What does a gold vein in the rock look like? | |


